
Mode Help
Explore and share data
Report scheduling and sharing
Sharing and scheduling
To share a report, open it and click Share in the report header.

To share a report via email with one or more teammates (or even with yourself!), enter a comma-separated list of their email addresses here. You can include a short message to provide context and use the options at the bottom to further customize the email they will receive. When you click Send, Mode will send the email immediately.
You can choose whether or not to include links to Mode reports when you share them via email, Slack, or PDF. To remove report links when sharing, un-check Include report links.
If the report does not have external sharing enabled and you enter an email address which is in a domain claimed by your Workspace but which is not a member of that Workspace, the user will automatically be invited to join your Mode Workspace and must become a member in order to see the report.
Slack
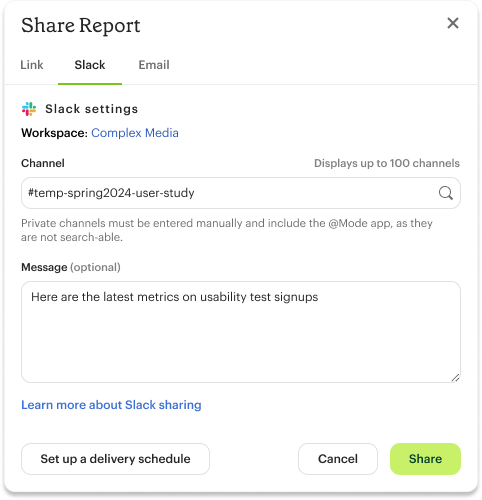
To share a report to a channel in a connected Slack workspace, select the name of the Slack channel and optionally include a message to provide context. The Slack message will always include your name, the report title, an internal link to the report. An image preview of the report output will also be included unless this setting is disabled for your Workspace by an admin. When you click Send, Mode will post the message to the designated Slack channel immediately.
To share a report to a private channel in a connected Slack workspace, type the private channel name into the Channel picker exactly as it is; private channel names will not be autocompleted.
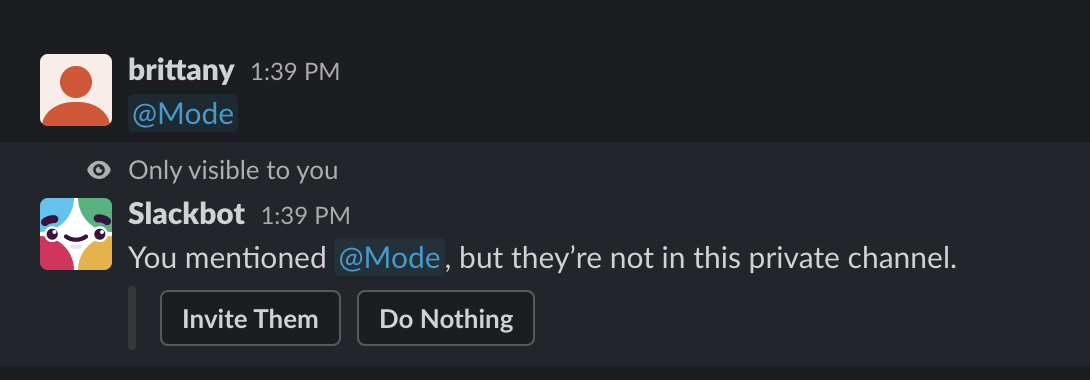
Prior to clicking Send, be sure to add the @Mode slack bot to any private channels that will be sharing destinations. You can do this by mentioning @Mode in the channel and then you’ll be given the option to add the bot to that channel. Private channels without the @Mode bot cannot receive shared reports. Here’s an example to add a bot to a Slack channel:
Everyone in the Slack channel you choose will see the message you share (including the image preview), even those who are not members of your Mode Workspace or who otherwise would not have access to the report in Mode. However, only those who have access to the report in Mode will be able to access it via the included report link.
Link

Every report has a unique set of links that can be used to access it and share it with others. These links never expire unless the report is deleted:
- Internal Links - Accessible only by logged-in members of your Mode Workspace with access to the report.
External Links - Report visualizations and query results are viewable by anyone on the internet. Visible when external sharing is enabled for the report.
You can also select the kind of output that is returned:
- Report Link: Displays the report with data from the most recent time it was run.
- Run Link: Displays the report as it appeared at the time you generated the link.
Click Copy next to any link to copy that link to your clipboard.
/runs/[RUN_TOKEN]/ near the end of the URL path.Scheduled runs
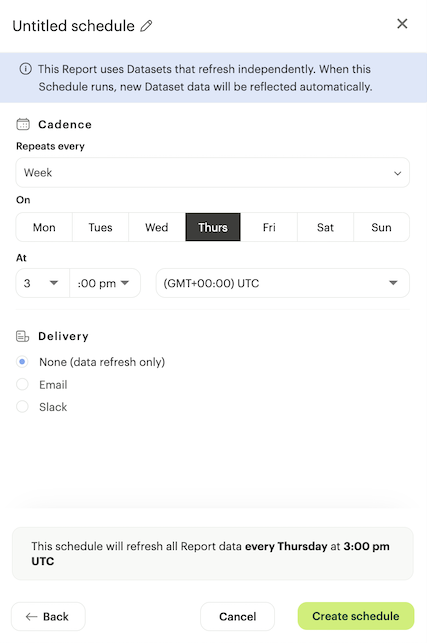
Any member of your Workspace with edit access to a report can configure that report to be run, and optionally shared, on a regularly occurring schedule. Reports can have multiple schedules configured so the report is sent to different groups of users at different frequencies.
To create a new schedule or manage existing schedules for a report, open the report and click Schedule in the report header. To modify or delete an existing schedule, click on the gear ![]() next to it. To create a new schedule:
next to it. To create a new schedule:
- Click New Schedule.
- Add a name for the schedule to describe its purpose.
- Configure the schedule, including the refresh frequency as well as parameter values and delivery settings (if applicable).
- If you want the scheduled report run to be delivered via email, click Create + Manage Subscribers and add all recipients on the next screen.
- Click Create Schedule.
Report schedule failure email notifications get sent to the Report creator, the schedule creator, and the last editor each time the schedule runs and fails until the error is resolved, or the schedule is deleted.
Scheduled runs will include Mode's Notebook as long as the Report view page contains at least one output generated from the Notebook. At that point, the Notebook will refresh when the report itself is re-run. To add a Notebook output to your report, click Add to Report located on the Main or Cell Toolbar of the Notebook.
External sharing
External sharing must be explicitly enabled on a report-by-report basis. When external sharing is enabled for a report:
- Anyone on the internet with an external link to the report may view the report's visualizations (e.g., charts, display tables, etc.) and query results. The underlying code, other report runs, and any other information won't be visible.
- The report may be shared via email with recipients outside your Mode Workspace or claimed domain.
- Sharing the report from Mode via email or PDF will not contain any Mode branding.
Once an admin has enabled external sharing for your Workspace, as long as the report has been moved to a collection, anyone with edit access to a report may enable or disable external sharing for it. To enable or disable external sharing for a report:
- Open the report and click Share in the report header.
- Toggle the switch in the pop-up so it says "External sharing of this report is ON" to enable. To disable, toggle the switch in the pop-up so it says "External sharing of this report is OFF".
- Close the pop-up.
The report can now be accessed by anyone on the internet using an external link. If you disable external sharing for a report, any previously generated external links to the report will immediately stop functioning and will return a 404 Not Found error.
PDF exports
PDFs are a great way to take a point-in-time snapshot of your content in Mode to share with others. Mode PDFs are single-scroll documents that mimic the experience of viewing a report in Mode.
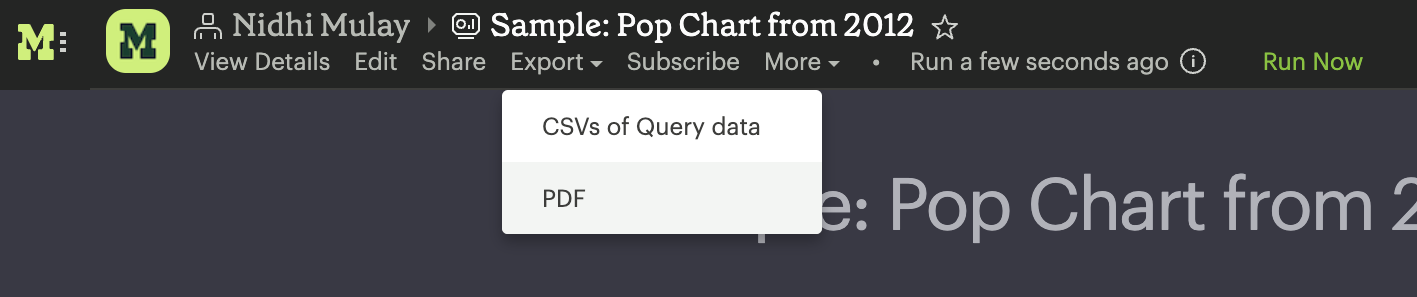
To create a PDF export of your report, open it and click Export > PDF in the report header. If this is the first time the PDF is being generated for the report’s run, you will see a loading modal. If a PDF already exists for the run, the PDF will download via your browser.
If you encounter visualization issues in your PDFs or previews (e.g., blank charts, error messages), we highly recommend reviewing your report to ensure that all queries, even those not linked to a visualization, are executing successfully.
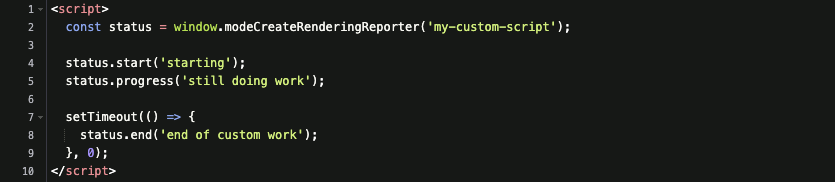
If your report contains custom scripts, please declare the "start" and "end" of the processing taking place within the Customize HTML container.
Access the function modeCreateRenderingReporter(name: string) on the window object from within the custom script. This function will return a RenderingReporter instance.
3 functions will be available for use (each capable to receive a comment):
start(comment: string);progress(comment: string);end(comment: string);
Call the start() function at the beginning of the custom script. You may call progress() to denote incremental processing progress. Calling progress() also signals to keep waiting on the custom script. After the custom script processing is complete, call end().
Example:
const status = window.modeCreateRenderingReporter('MyCustomScript'); // returns a rendering reporter instance.
status.start('starting the processing');  // signals the start of work.

// some work...

status.progress('script is still processing'); // used to communicated long running tasks.

// some work...

status.end('script is done processing'); // signals the work segment is finished.
FAQs
Q: Can you subscribe a user to a report without sending an email notifications?
If you subscribe a user to a report, they will always receive an email notification letting them know that they have been subscribed. There is no way to disable this notification, so users should be aware that they will receive an email each time they are subscribed to a report.
It's important to keep this in mind when subscribing users to reports, as they may receive a large number of notifications if they are subscribed to many reports. They will have the option to unsubscribe.
Q: Is there a way to disable the generated image in slack when creating schedules?
Allowing data previews, PDFs, and CSVs to be included in emails and slack messages is enabled by default. When disabled, report image previews will no longer appear the message bodies of Slack or Email shares, and reports shared via email can no longer contain attached PDFs. Admins can control how members of their Workspace are able to share reports both internally and externally.
- Navigate to the Mode home page, click on your name in the upper left corner of the screen and click Workspace Settings from the dropdown menu.
- Click on Sharing & Embedding under Features.
See the full documentation for sharing data in Mode here.
Q: How long is the generated image in Slack available for?
The report image preview is live for 4 days after posting in the Slack channel. After this time, the image will be replaced with a stock image stating that the report preview has expired. Users with Mode access can still access the report to view data from the latest run via clicking the URL shared in the Slack message.
Q: How to create a schedule with dynamic date parameters
When creating schedules in Mode, you may want to set up a date parameter that's relative to the time the schedule runs. For example, rather than setting a date parameter to show data from January 1, 2023 to today, you may want the set up the parameter to show data over the last week.
You can do this using an if statement in your query. The query below shows an example.
There are two parameters: start_date and previous_week. If previous_week is true, the if statement will return the line in the query that only includes orders in the last week. If the previous week value is false, the query will use the line that includes orders that occurred after the chosen parameter start date.
SELECT DATE_TRUNC('day',occurred_at) AS day,
       COUNT(*) AS orders
  FROM demo.orders
 WHERE occurred_at <= NOW()
{% if previous_week == 'true' %}
   AND occurred_at >= NOW() - INTERVAL '7 DAY'
{% else %}
   AND occurred_at >= '{{start_date}}'
{% endif %}
 GROUP BY 1
 ORDER BY 1

{% form %}

start_date:
  type: date
  default: 2023-01-01

previous_week:
  type: select
  default: 'true'
  options: ['true','false']

{% endform %}
You can see a live version of this report here.
You could do this with a single parameter as well. For instance, instead of using the previous_week parameter in the if statement, you could use the start_date parameter:
{% if start_date == '2023-01-01' %}
   AND occurred_at >= NOW() - INTERVAL '7 DAY'
{% else %}
   AND occurred_at >= '{{start_date}}'
{% endif %}
In this case, if you picked that specific date (Jan 1, 2023), the parameter would use the first AND statement. This way, you can use this relative date option for a report schedule without having to add an additional parameter that might lead to confusion for people running the report manually.
You can do things like this with if statements in Mode because it uses the Liquid template language to create parameters. You can read more about what you can do in Mode with this language and common techniques here.
Q: Can you remove the Mode branding from a PDF export from within Mode’s UI?
At this time, there is no currently available method for removing the Mode logo from PDFs. However, if your report has external sharing enabled, the downloaded PDF will not include the Mode logo at the bottom of the PDF. Additionally, you can also try enabling this feature in White Label Embed reports.
Troubleshooting
1. Why didn't my scheduled report send?
If the schedule for the report does not fire or is not sent, it could be due to an error in the underlying SQL query. This could be caused by a change in the query or database schema, a loss of connection between Mode and your database, or one or more queries in the report taking too long to run and timing out. You can check the report's run history on the View Details page to verify the cause.
If the issue is not related to any of the above, please don't hesitate to reach out to our Support team for further assistance.
Was this article helpful?