
Mode Help
Connect your database
OverviewManaging database connections
Private data connectionsControlling accessQuery Headers & FootersMode Public Warehouse
Managing database connections
Overview
You can connect as many private databases to your Mode Workspace as you like. Mode supports connecting to most popular types of relational databases. When you connect a database to your Mode Workspace, by default all members of your Workspace will be able to run queries against that data connection.
All Workspaces are also automatically connected to the Mode Public Warehouse.
Private data connections
Connect a new database
To connect your database to your Mode organization:
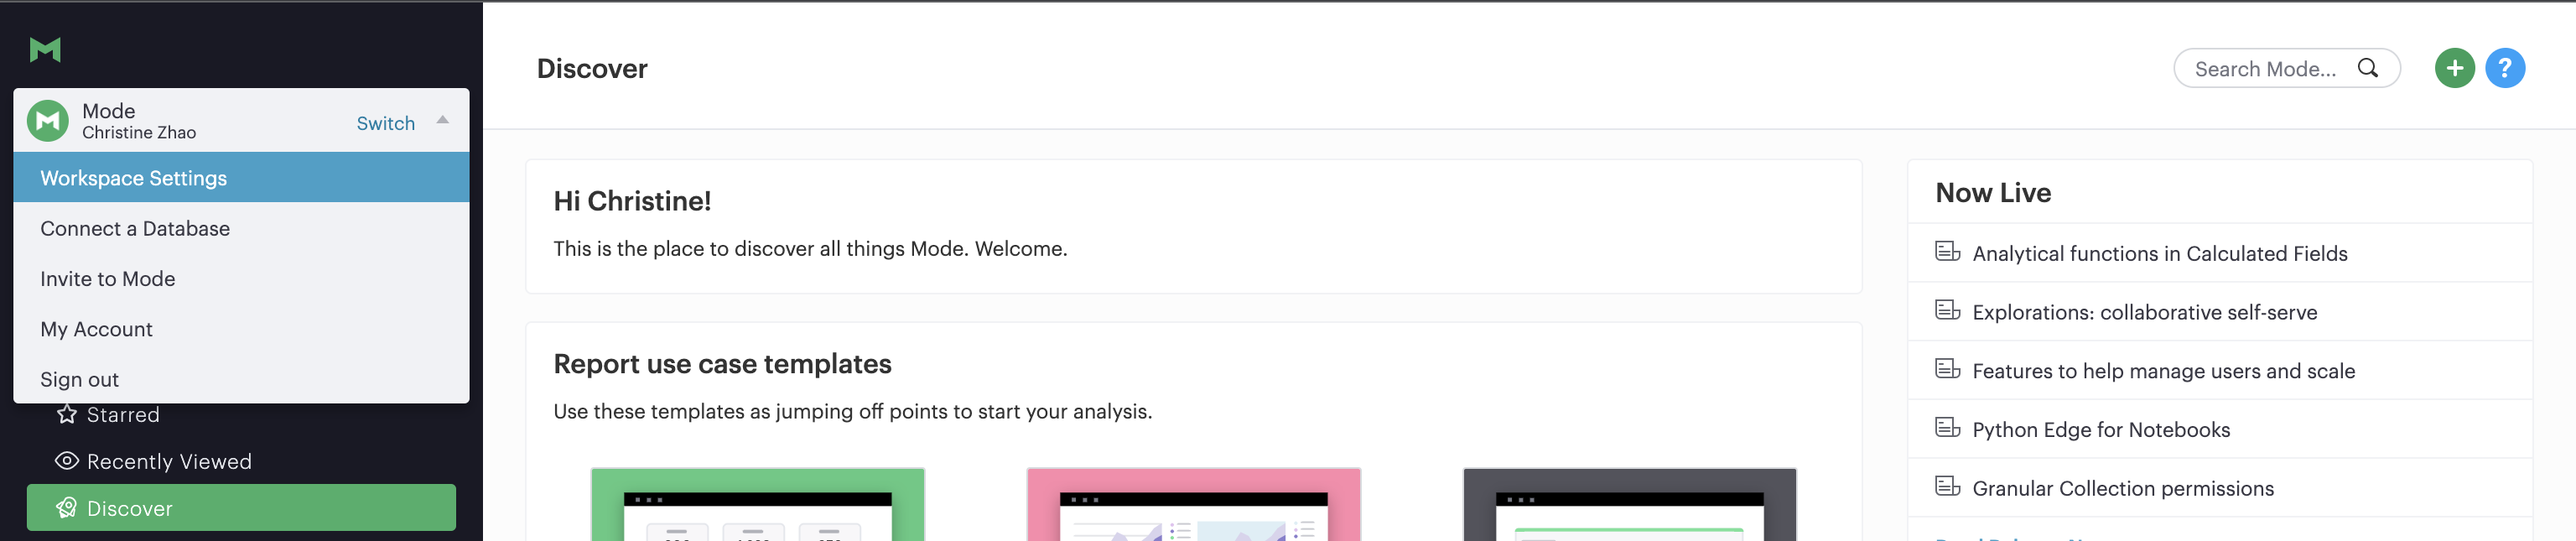
- Navigate to your Mode homepage and sign in.
- Click on your name in the upper left corner of the screen.
- Click Connect a Database.
- Follow the instructions to connect your database.
Learn more about how Mode connects to private databases.
Modify or disconnect a connected database
You delete or modify the settings and credentials for a database connection only if you're an admin or if you were the member who connected it to the Workspace.
- Navigate to the Mode home page and sign in.
- Click on your name in the upper left, and click Workspace Settings
- In the Data section, click Connections.
- All the database connections for your Workspace will be listed on the right.
- Click on the connection and then go to the Connection Properties tab to adjust the database credentials and configuration. Click Delete to disconnect this database from Mode.
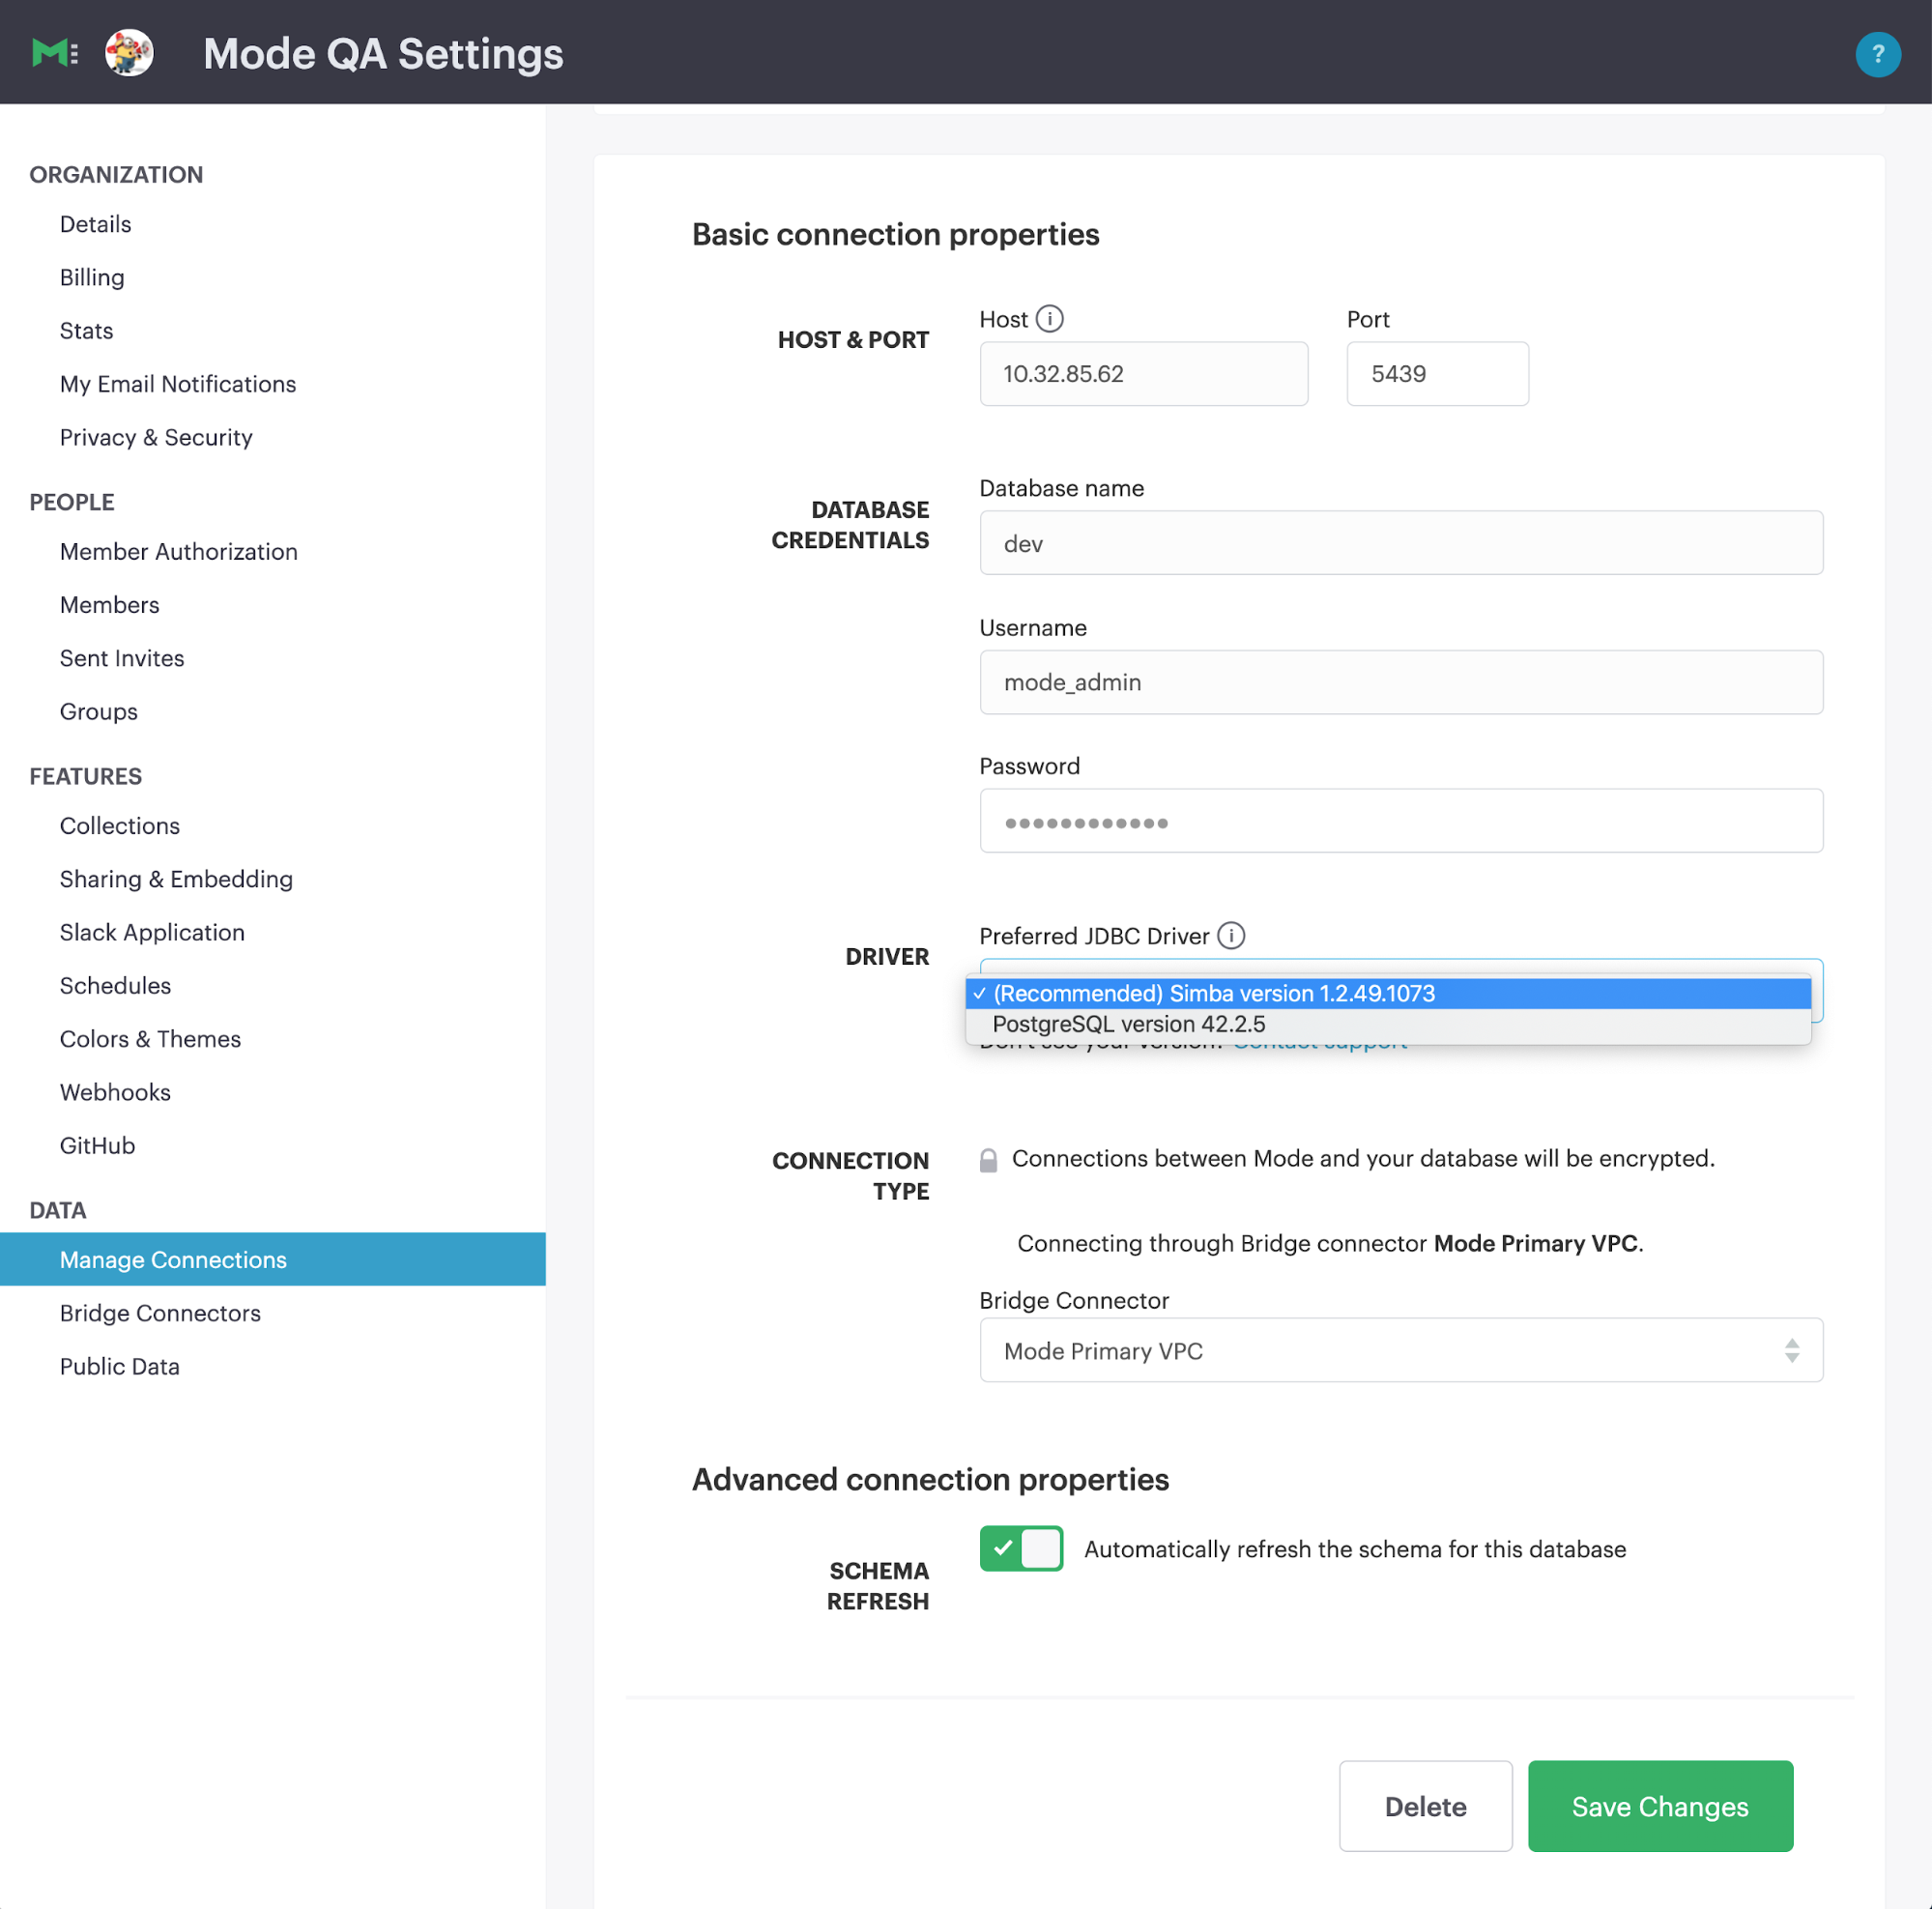
Update preferred JDBC driver
To update the driver Mode uses to connect to one of your data sources, you must have the Manage Data Source permission or higher.
-
Open the menu beneath your name in the upper left corner and select Workspace Settings.

-
Scroll down to the Data section and select Manage Connections. In the main panel, select the connection you’d like to update from the list.

-
Review & update the selected driver. Details on all driver versions and known issues are documented for each database technology below.
-
Re-enter the password of the Mode database user or otherwise re-authenticate the credentials, then Save changes.
-
You should see a blue banner at the top of the screen indicating the connection properties have been updated.

-
An error like this indicates the user name & password (or equivalent) must be re-entered before saving the driver changes.

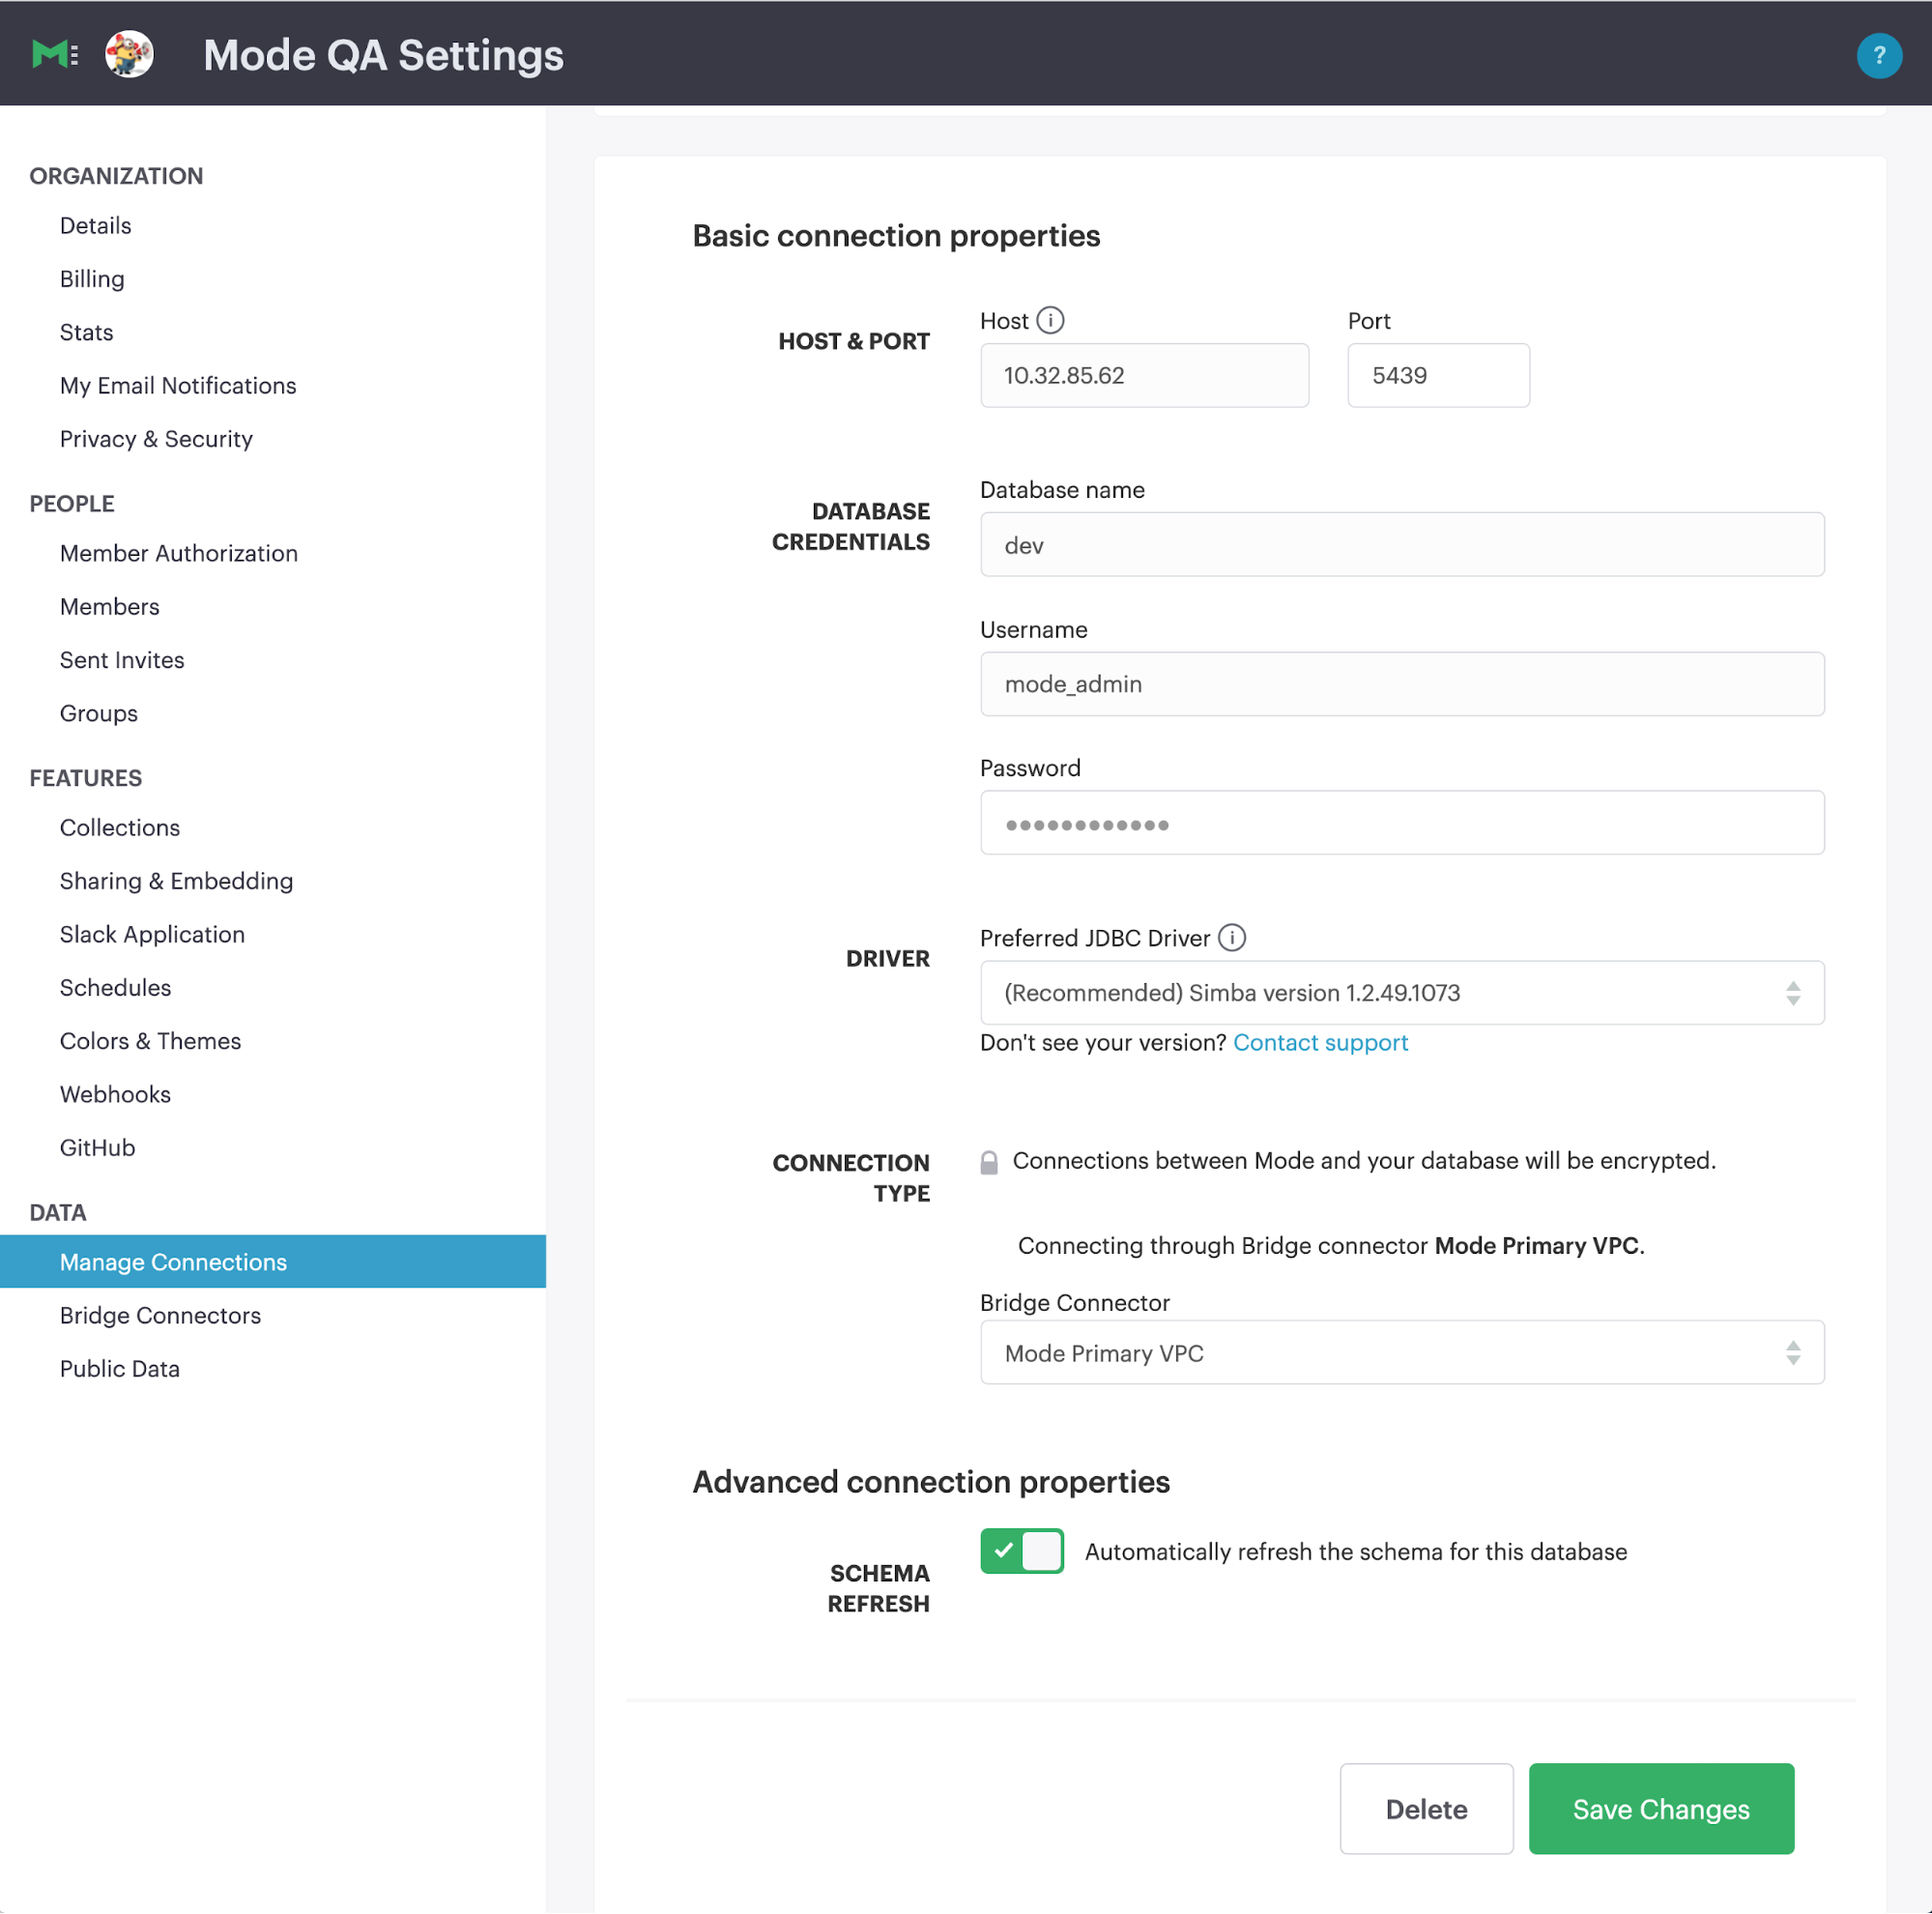
Disable or Enable Automatic Schema Refresh
For Admins and users with "manage" permission:
- In the Connections section, select a database connection to navigate to the settings.
- Toggle off or on Automatic Schema Refresh.
- Confirm and save changes to the connection properties. Schema refresh will now be disabled or enabled.
- Manually refresh the schema with the button at the top of the page.
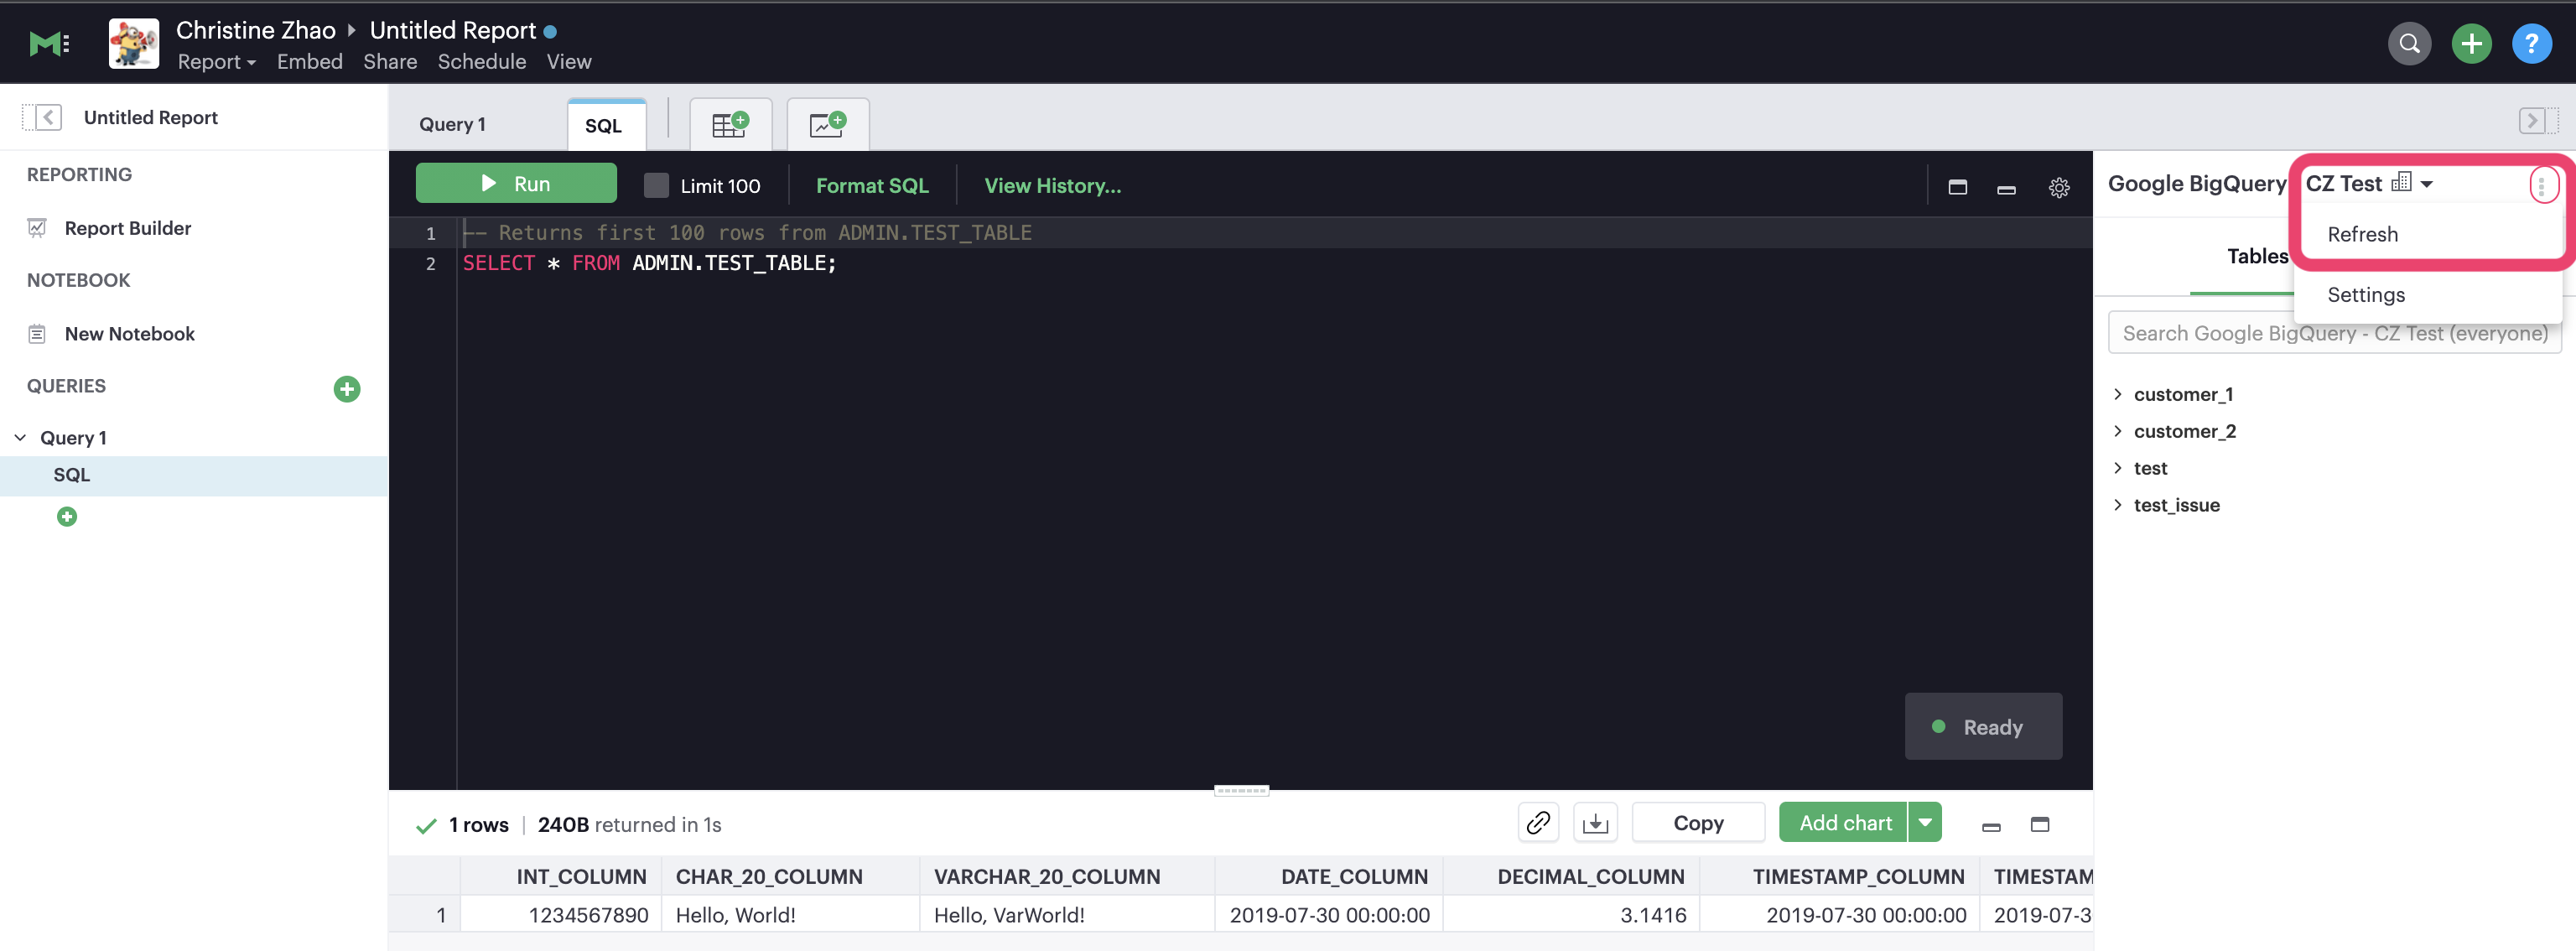
Trigger a Schema Refresh
Mode’s schema update frequency is daily at 3:05pm UTC (7:05am PST / 8:05am PDT based on daylight savings). However, you can trigger a schema refresh at any time.
- In the SQL editor, click on the kebab menu next to your data source and click on Refresh.
- You can also go to Workspace Settings in the menu beneath your name.
Then go to Manage Connections under the Data section to select the data source. Click on the Refresh schema button on the top right corner.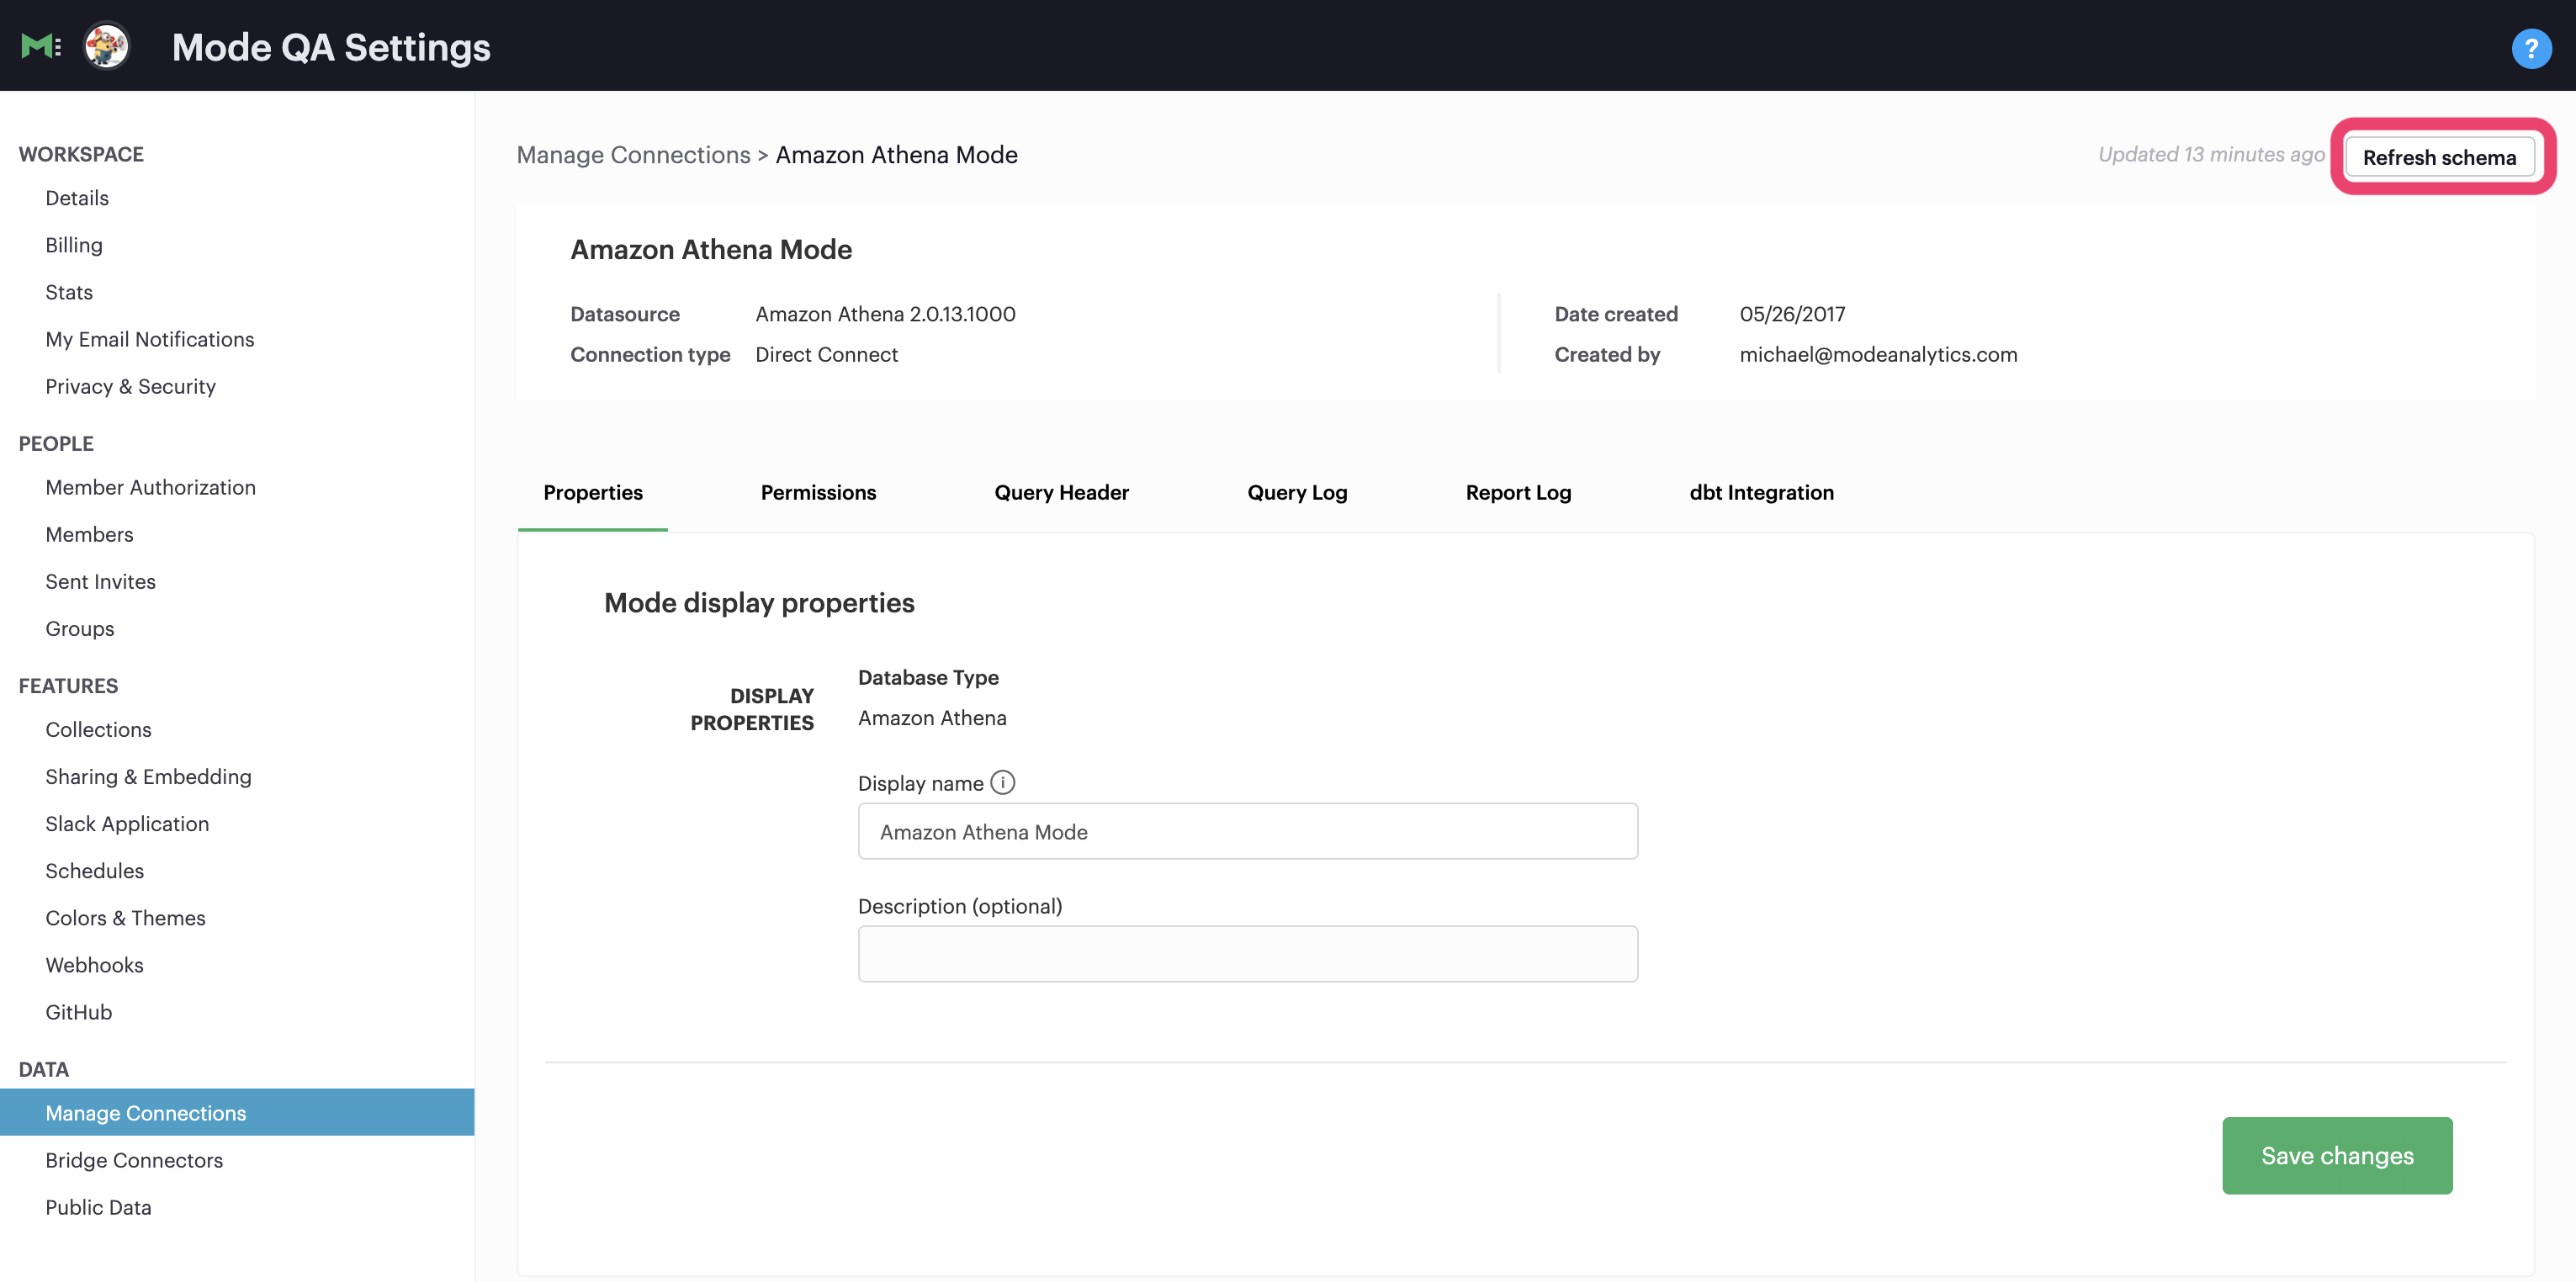
Controlling access
Database user permissions
Most databases provide robust permission systems, which let you manage user roles to set detailed schema- and table-level permissions. In Mode, your Workspace will access each data connection through a single user, which we recommend you or your database admin create expressly for use with Mode.
Members of your Workspace who use this data connection will be able to access the data source according to the permissions granted to this user in your database. You can connect Mode to the same database multiple times via different database users, with varying levels of permissions.
There are various ways you can control the data that members of your Workspace can query in Mode. One way is to leverage the permissions granted to the single user your Workspace relies upon to connect to a given database. Limiting that user’s permissions on the database side will, in turn, restrict the access of all members of your Mode Workspace for that data connection.
Limit access to a data connection in Mode
Admins in a paid plan Workspace can also limit access to a data connection to specific non-admin users or user groups directly in Mode. If a non-admin user does not have access to a connected database, that user will not be able to:
- Query the database or create, duplicate, edit or schedule any reports that query that database.
- Write or view any of that data connection's Definitions.
Connection admins can set the default connection access policy for everyone in their Workspace to have View or Query access to the connection, or choose to set up access to None.
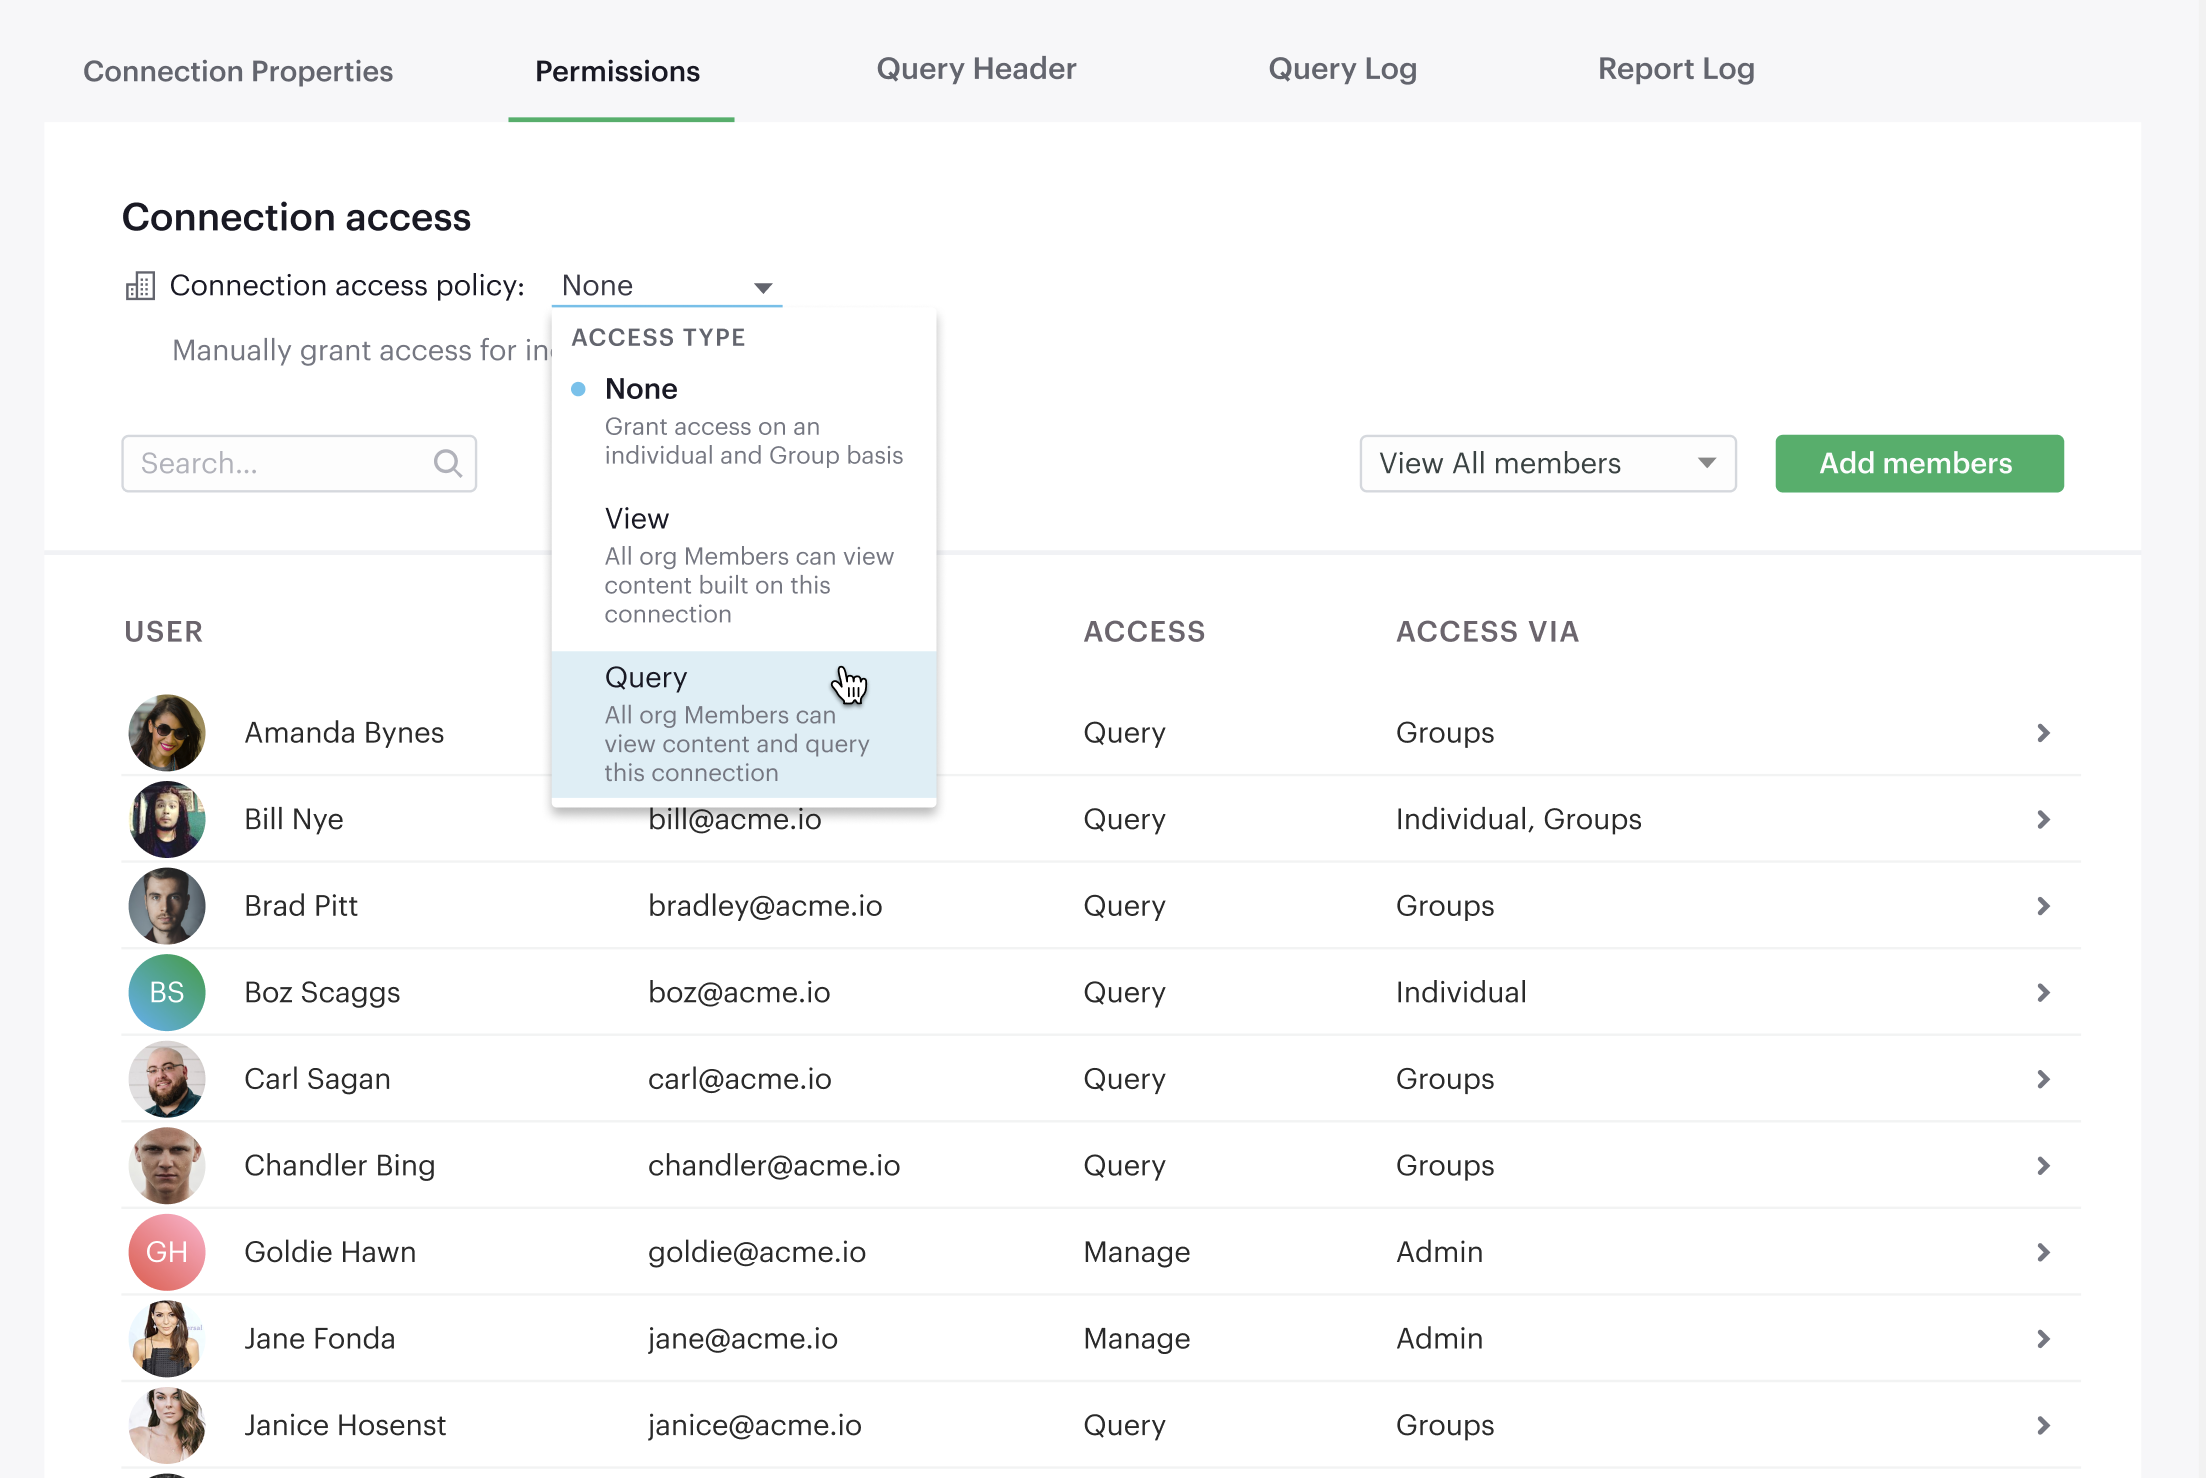
- The access type View allows all members to view content built on this connection.
- The access type Query allows all members to view and query this connection.
Granting Access Type to Groups and Individuals
In addition you can grant Query, View or Manage access to groups and individuals.
To set up Permissions to a connected database in Mode:
- Navigate to the Mode home page and sign in.
- Click on your name in the upper left, and click Workspace Settings
- In the Data section, click Manage Connections.
- Click on the data connection you want to limit.
- Click the Permissions tab.
- Click on Connection Access Policy, to set the default access type to None, View, Or Query.
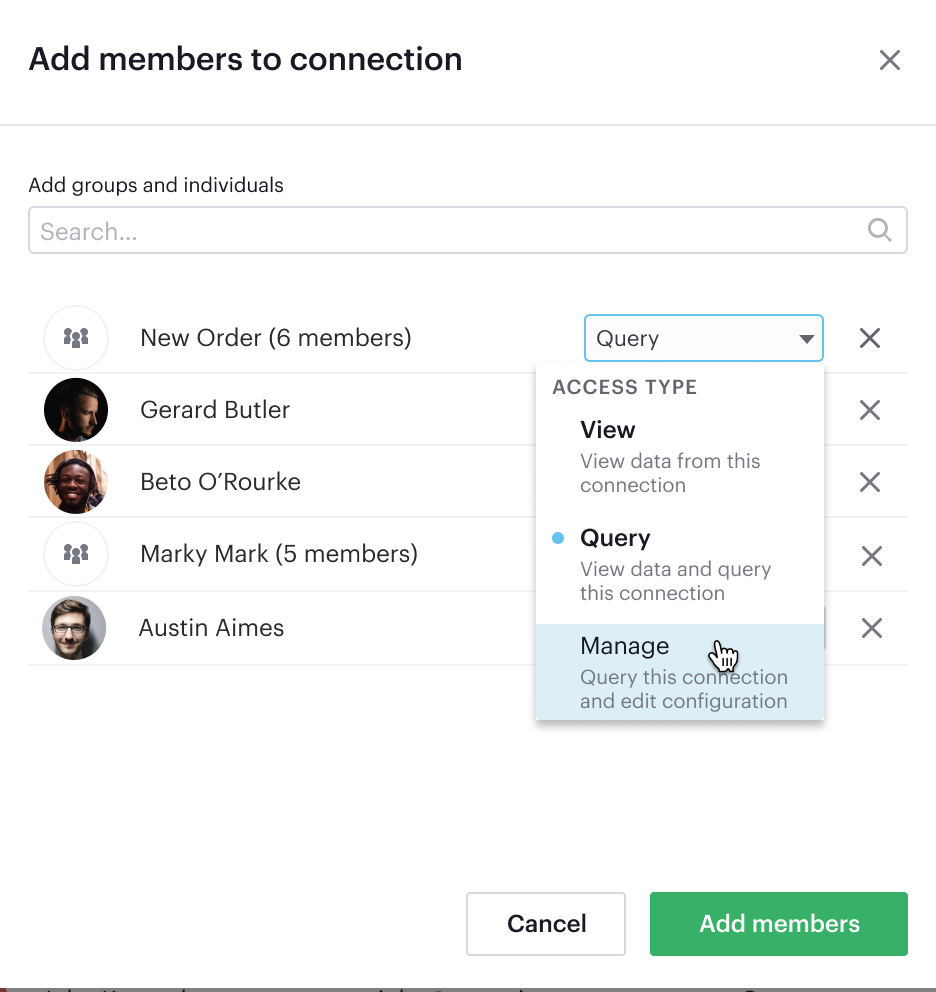
- To manually add users and user groups, click Add members. When in the pop-up box, click on each user or user group that you want to grant access to this connection.
- Once you click on the user or user group, you will have the option to grant Query, View, or Manage access.
- If you change your mind and want to remove that member, click on the user or user group, then click on the Access Type and choose Remove Access and then confirm Remove Access.
How database permissions and Mode permissions interact
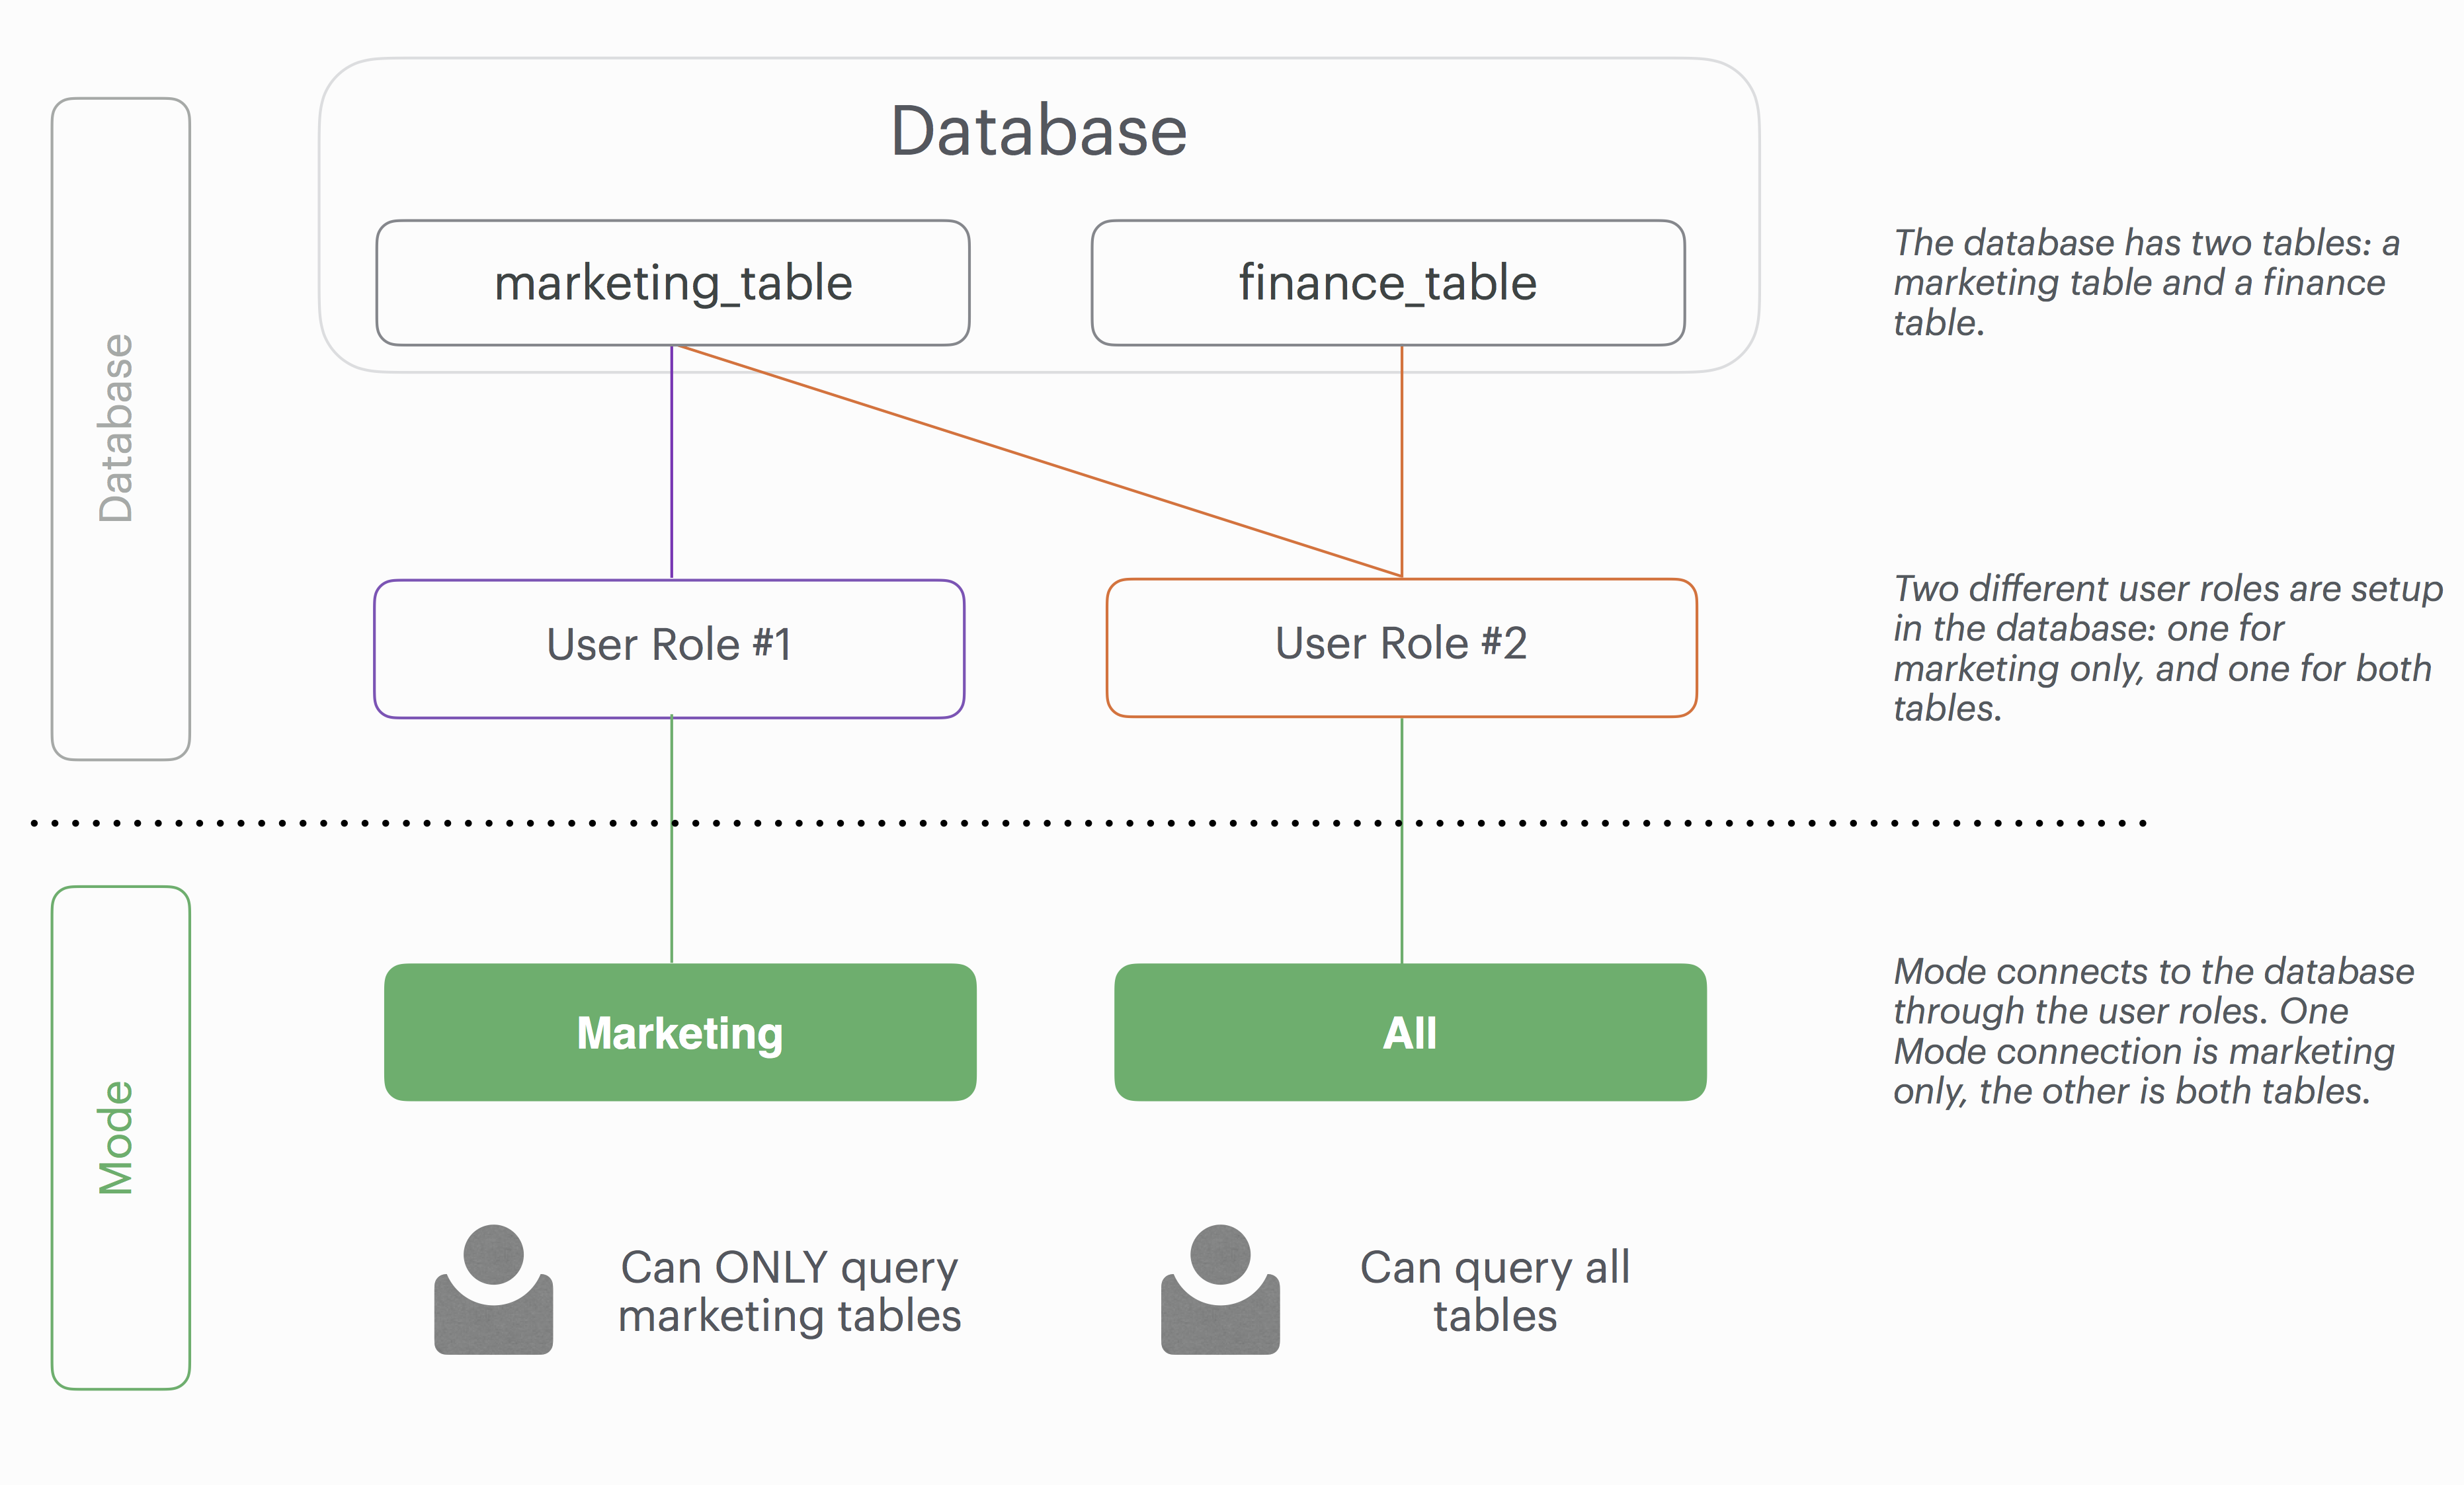
Here's an example of how this setup might look for a company with a single database, connected to Mode via two different database user roles.
Note that these permissions only determine query access. Users in your Workspace will be able to see a report created with one of these data connections unless the report is in a private Collection.
-
In this simplified example, the company's database contains two tables: a marketing table and a finance table containing sensitive information.
-
There are two user roles (managed at the database level):
- User Role #1 only has access to the marketing table.
- User Role #2 has access to both the marketing table and the finance table.
-
When you connect a database to Mode, you do so using database user roles. Each connection will appear as a different database in the schema browser. Note that the default name will be the name of the database (e.g. Redshift), but you can also name it based on a description of the access level or user role.
-
Paid plan Workspaces can also specify which Mode users have access to each connection.
- A user with query access to “Marketing” will ONLY be able to query the marketing table. They will not have access to any sensitive financial information.
- A user with query access to “All” will be able to query the marketing and finance tables.
Query Headers & Footers
Mode enables customers to annotate queries in two ways:
- Mode allows customers to define, using Liquid parameters and SQL, metadata attributes to be sent about each query. This metadata can include Mode user or query attributes (e.g. username, query runner group, or timestamp of query run. Mode calls these Query Headers.
- Mode automatically appends a SQL comment to each query with the following static Mode user attributes: email, timestamp of query run, Mode query run URL, and a boolean indicating whether the query was executed manually or scheduled. Mode calls these Query Footers.
Query headers
Custom query headers allow admins to prepend queries with code that executes every time a query is run against the data connection. Using custom query headers you can:
- Manage database load by giving services downstream of Mode context about who is running the query or why it is being run.
- Automatically set environment variables, such as default schemas and time zones.
- Add custom logging to each query that will appear in your database's logs.
Modify a data connection's query header
You must be the creator of a data connection or a Workspace admin to modify its query header.
- Navigate to the Mode home page and sign in.
- Click on your name in the upper left, and click Workspace Settings
- In the Data section, click Connections.
- Click on the data connection you would like to modify.
- Go to the Query Header tab.
- In the space provided, add or modify any valid SQL code (including comments and valid Liquid code) that you want Mode to prepend to all queries run against this connection.
- When you are finished, click Save.
Variables
Each time a query is executed, Mode automatically defines a number of Liquid variables containing useful audit information. You can reference these variables in your custom query headers to add audit information that will appear in your database's logs. Both SQL and Liquid parameters are supported. See our Blog:
| Variable | Output |
|---|---|
{{ query_runner_email }} | Email address of the user running the query |
{{ query_runner_username }} | Username of the user running the query |
{{ query_runner_groups }} | Array of group tokens* for groups the runner is a part of |
{{ run_at }} | A Unix timestamp of when the query was run |
{{ is_scheduled }} | True if the query was run as part of a schedule; false otherwise |
{{ query_run_url }} | URL containing the query token |
{{ report_run_url }} | URL containing the run token |
*Find a group's token by going to Settings > Groups > click a group. The token is a 12 character string at the end of the URL.
Examples
Assign scheduled queries to a different group in Redshift
{% if is_scheduled == true %}
SET query_group TO scheduled_queries;
{% endif %}
Set a default schema
SET SEARCH_PATH TO 'webapp';
Add comments with run date, type, and running user
This example is illustrated with a multi-statement query to show how headers & footers interact.
-- Run by {{ query_runner_email }}
-- Run at {{ run_at }}
{% if is_scheduled == true %}
-- Scheduled run
{% else %}
-- Manual run
{% endif %}
Query in SQL Editor (Mode):
SELECT 1;
SELECT 2
Renders to:
-- Executed by hi@modeanalytics.com
-- Query executed at 1591031089
-- Manual run
SELECT 1;
SELECT 2
In Postgres, we’ll see two distinct statement executions. The Header appears on the first statement only.
-- Executed by hi@modeanalytics.com
-- Query executed at 1591031089
-- Manual run
SELECT 1
The Footers only appears on the second statement (unless per-statement footers are enabled).
SELECT 2
-- {"user":"@jane_doe","email":"hi@modeanalytics.com","url":"https://modeanalytics.com/modeqa/reports/1820851ba5a0/runs/a85b6da6912d/queries/d7f43f015d70","scheduled":false}
Query Footers
Mode always appends a non-customizable SQL comment annotation at the end of a query. By default, this annotation is made per query. For a multi-statement query (see example) the footer is only appended to the second statement by default. Mode is able to enable per-statement footers if the Workspace uses multi-statement queries.
Query Footers are not visible in Mode’s SQL Editor to the user while editing a query and Query Footers do not display in Mode’s UI as a part of the query syntax for a past query run. This annotation does appear as part of the syntax executed by the database.
The annotation always includes:
- user: query runner’s username
- email: email address
- url: complete query run url
- scheduled: true/false
Examples
In Mode:
SELECT 1;
SELECT 2
In Snowflake (two distinct statement executions; without per-statement Footers, only the second statement show the footer comment):
SELECT 1
SELECT 2
-- {"user":"@jane_doe","email":"hi@modeanalytics.com","url":"https://modeanalytics.com/modeqa/reports/1820851ba5a0/runs/a85b6da6912d/queries/d7f43f015d70","scheduled":false}
In Snowflake (two distinct statement executions; with per-statement Footers, both statements show the footer comment):
SELECT 1
-- {"user":"@jane_doe","email":"hi@modeanalytics.com","url":"https://modeanalytics.com/modeqa/reports/1820851ba5a0/runs/a85b6da6912d/queries/d7f43f015d70","scheduled":false}
SELECT 2
-- {"user":"@jane_doe","email":"hi@modeanalytics.com"","url":"https://modeanalytics.com/modeqa/reports/1820851ba5a0/runs/a85b6da6912d/queries/d7f43f015d70","scheduled":false}
Mode Public Warehouse
Mode hosts a public PostgreSQL data warehouse so you can share data and analysis with the entire Mode community. The Mode Public Warehouse is a great tool that you can use to:
- Learn SQL by completing Mode's SQL school.
- Share analysis with or learn from anyone in the Mode community.
- Experiment with all of Mode's features.
Anyone with a Mode account has access to the Mode Public Warehouse and can build reports on top of the data inside it.
Was this article helpful?