
Mode Help
Administration
Restricting sign-in methodsAuthentication and SSO
Custom SAMLSCIMOktaAzure Active DirectoryBest PracticesFAQs
Authentication and SSO
Restricting sign-in methods
Organization admins can set sign-in restrictions to control how members are able to authenticate when accessing their Mode Workspace.
- Navigate to the Mode home page.
- Click on your name in the upper left corner.
- Click Workspace Settings from the dropdown menu.
- In the People section, click on Member Authorization.
By default, users can log into your Mode Workspace with all of the following methods of access. Toggle off any methods that you do not want to allow users to authenticate with:
- Username and password
- Office365
- SAML provider of your choice (if configured)
Custom SAML
Admins may define one more custom SAML identity providers that your Mode Workspace can use to authenticate users:
- Navigate to the Mode home page, click on your name in the upper left corner of the screen and click Workspace Settings from the dropdown menu.
- In the People section, click on Member Authorization.
- To add a new SAML provider, click + Add New Provider. To edit or delete an existing provider, click the gear
 next to it in the list and click Edit or Delete.
 - Enter the SAML configuration and click Update when you are finished.
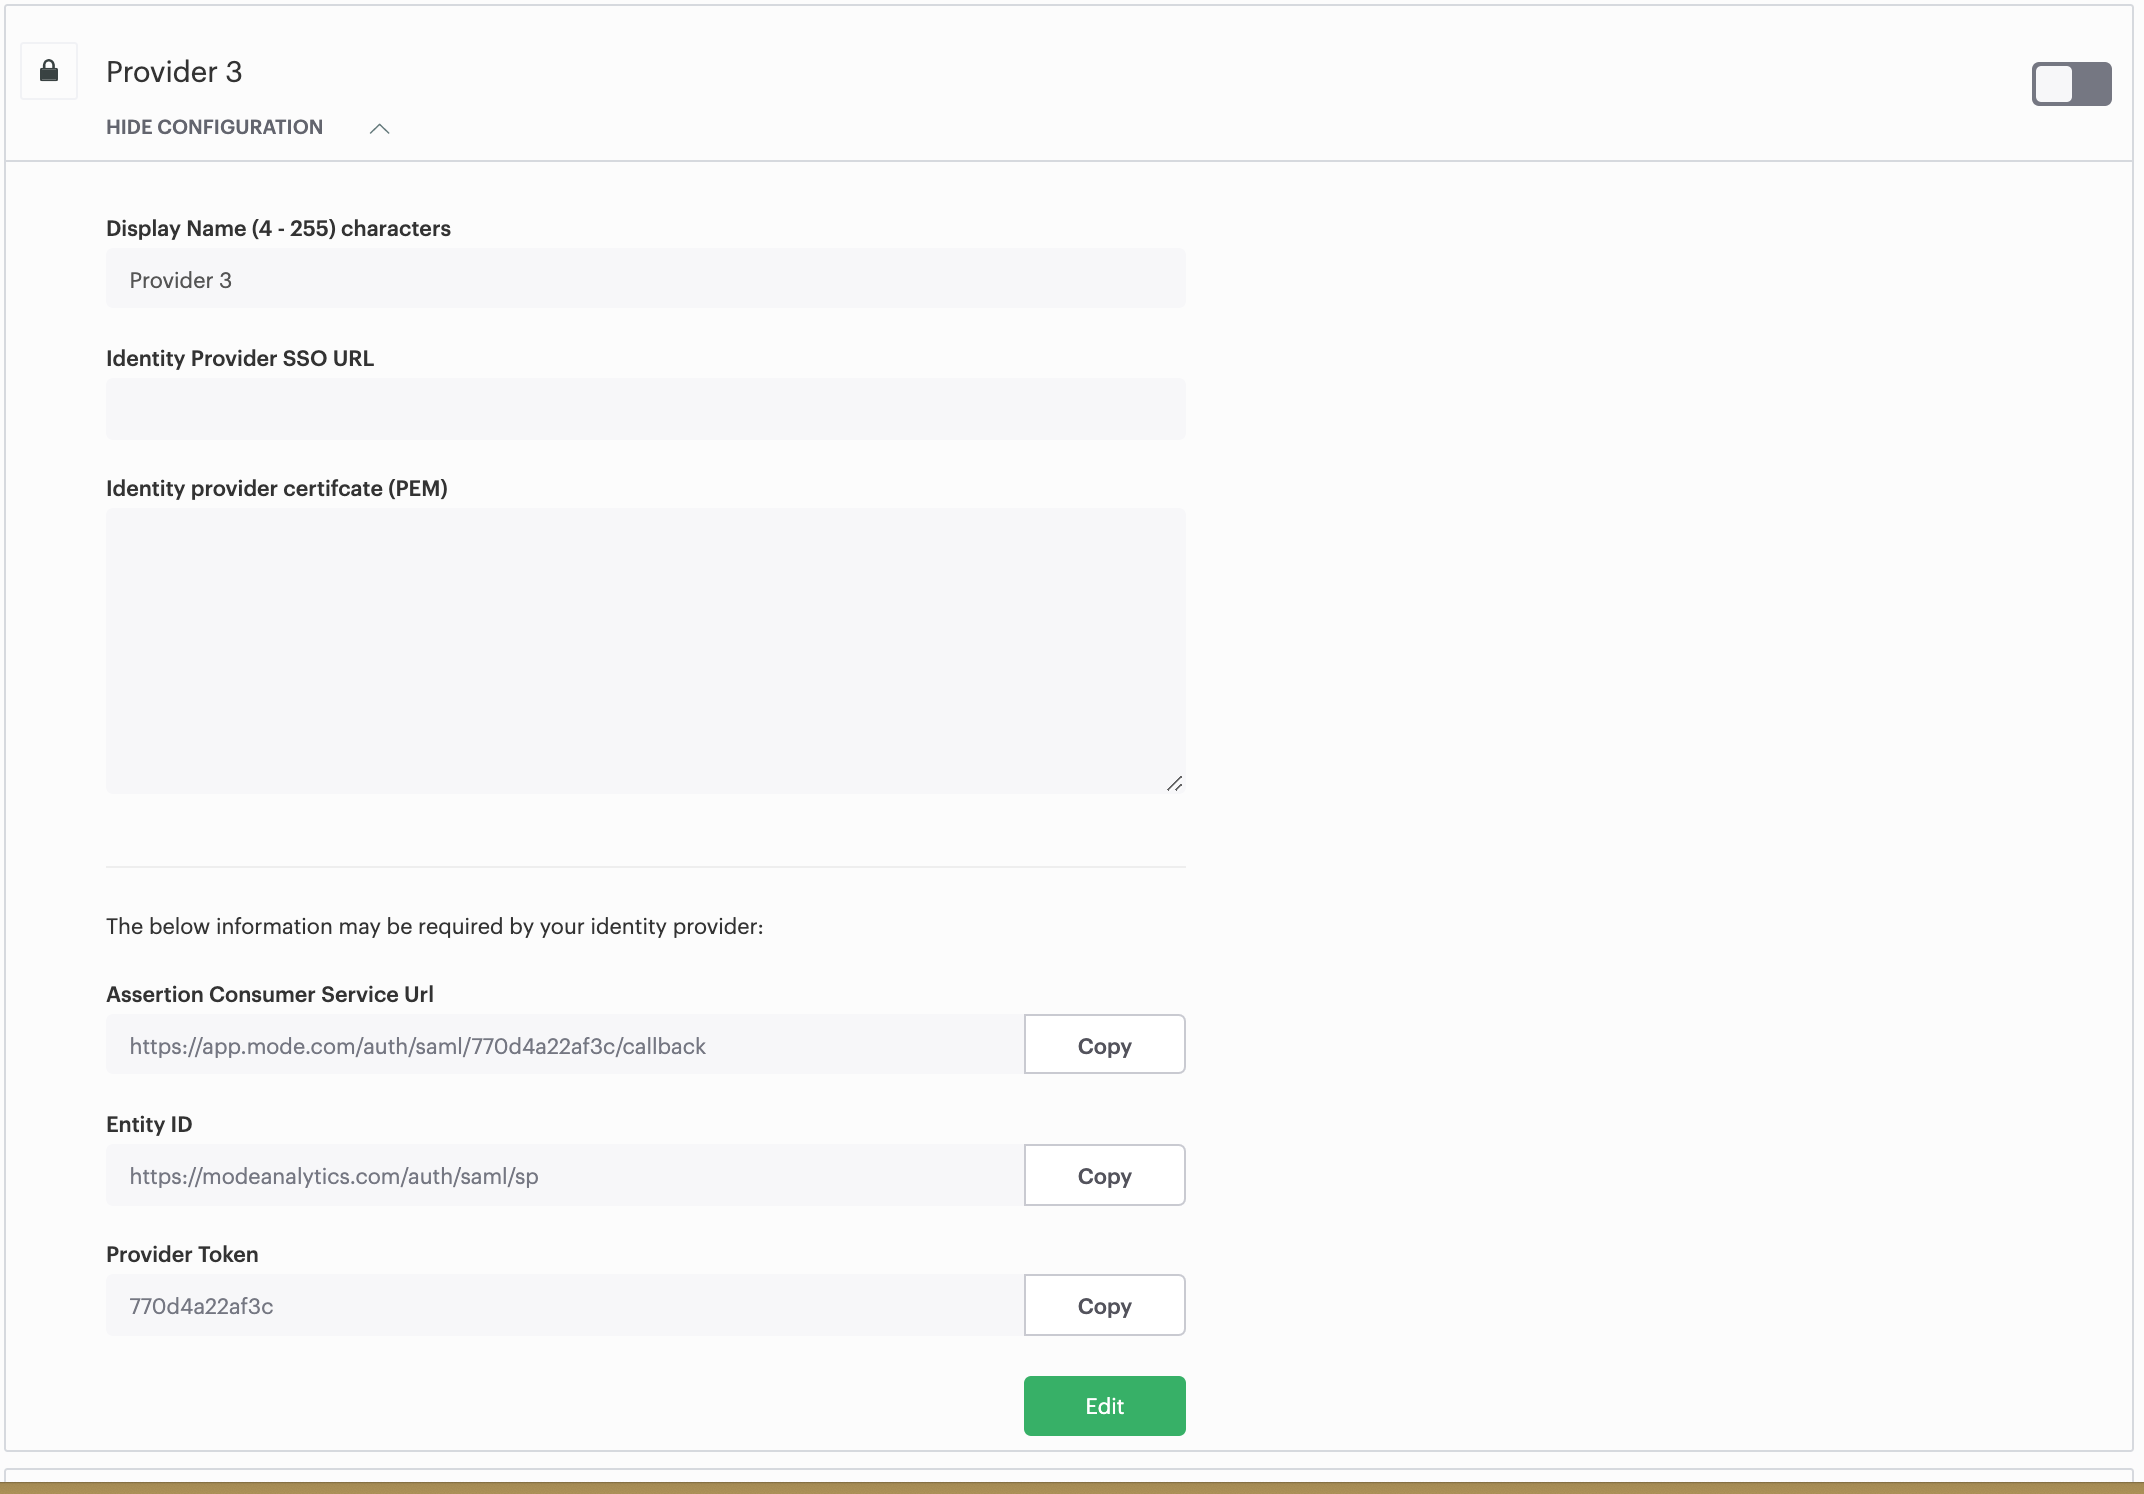
Custom providers will automatically create user accounts in Mode for emails that match your organization’s claimed domain. Setup is required for each provider. Once you create a new provider in Mode settings, you will see the following information which may be required for set up in your SAML provider:
- Assertion Consumer Service URL
- Entity ID
- Provider Token
SCIM
This guide walks through the supported features, requirements and troubleshooting steps for setting up SCIM for Mode. SCIM is supported for both Okta and Azure Active Directory (AAD).
SCIM is a protocol that lets enterprise identity providers (IdPs) integrate with and provision applications. This allows large Workspaces to keep all of their applications up to date with their org chart and maintain centralized control of app and data permissions.
Once you are integrated through SCIM, you will be able to provision users into Mode and manage Mode group memberships through your IdP, rather than needing to do it within the Mode UI. This allows you to manage Mode from the same place and in the same way that you manage other applications, and synchronize identity information like name and email across all of the apps that your members use.
The effect is a less tedious workflow for application administrators, resulting in tighter security and a more effective and accurate deployment of Mode into your workspace.
Requirements
Mode requires that SCIM customers have completed the SAML setup process and have a working Okta or AAD integration before setting up provisioning features with SCIM. Workspaces wishing to use SCIM are required to use SAML as their sole signin method.
See here for more information on how to set up SAML.
Okta
Supported Features
The following provisioning features are supported:
- Push New Users: New users created through OKTA will also be provisioned in Mode.
- Push User Deactivation: Deactivating the user through OKTA will remove the user from the organization and all groups in Mode. If they are reactivated they will need to have any groups reassigned to restore associated resource entitlements.
- Push Profile Updates: Updates made to the user's profile through OKTA will be pushed to the third party application. First Name and Last Name will be combined as the Full Name in Mode.
- Group Push: Groups and their members can be pushed to Mode. You can find more information about using group push operations here: Using Group Push.
- Reactivate Users: Reactivating the user through Okta will reactivate the user in Mode. They will need to have any groups reassigned to restore associated resource entitlements.
Import Users, Import Groups, and Sync Password are not currently supported.
Configuration Steps
-
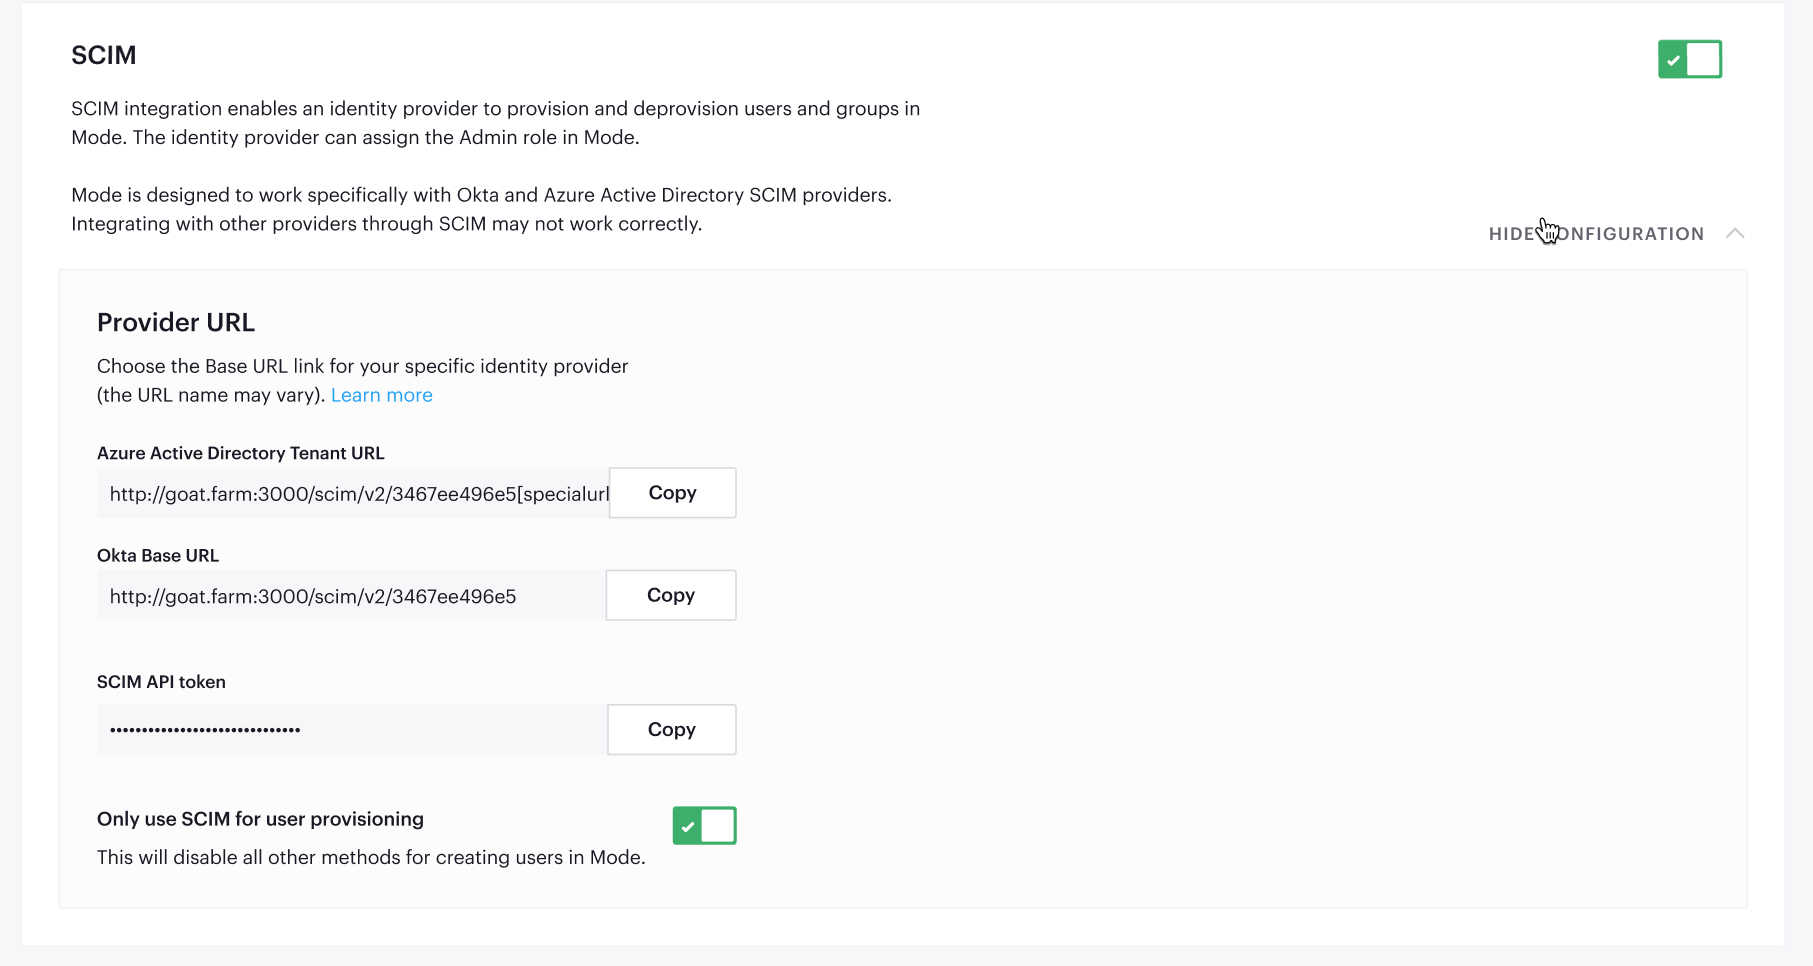
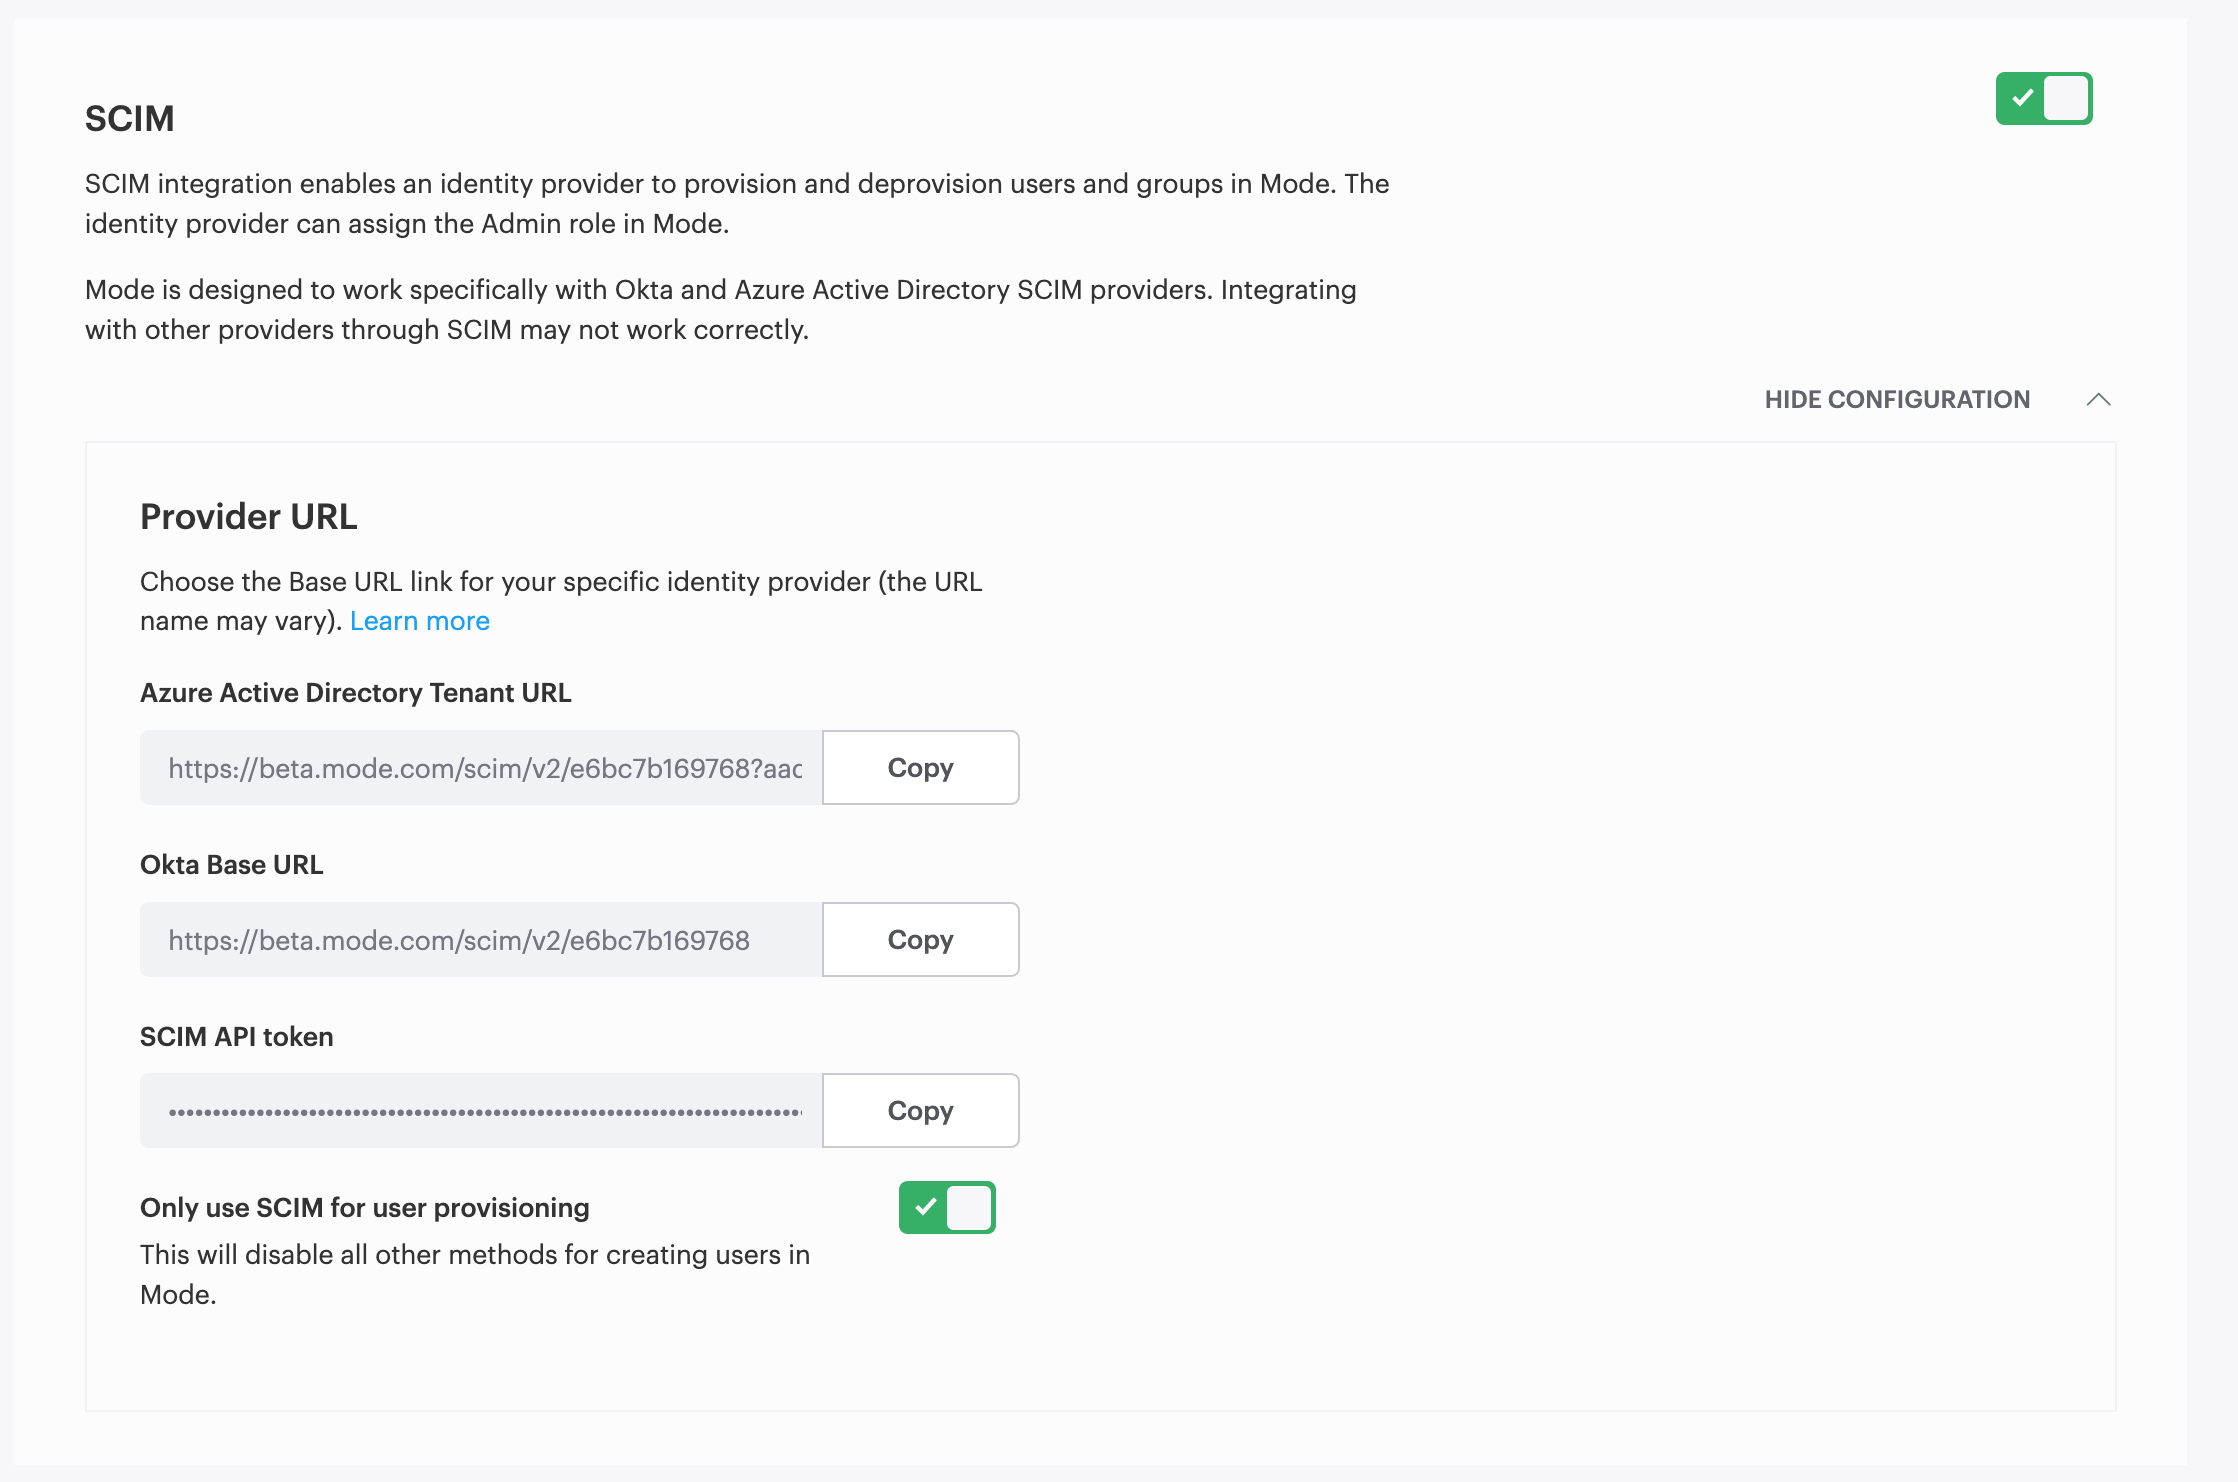
On the Member Authorization tab on the Workspace Settings page, turn on the switch labeled Enabled Okta SCIM. Please note that if you don't see this switch, you should contact your account manager for further assistance.
-
Click View Config Settings. You will need to copy the 2.0 Base URL and OAuth Bearer Token into your Okta App’s Provisioning configuration:
-
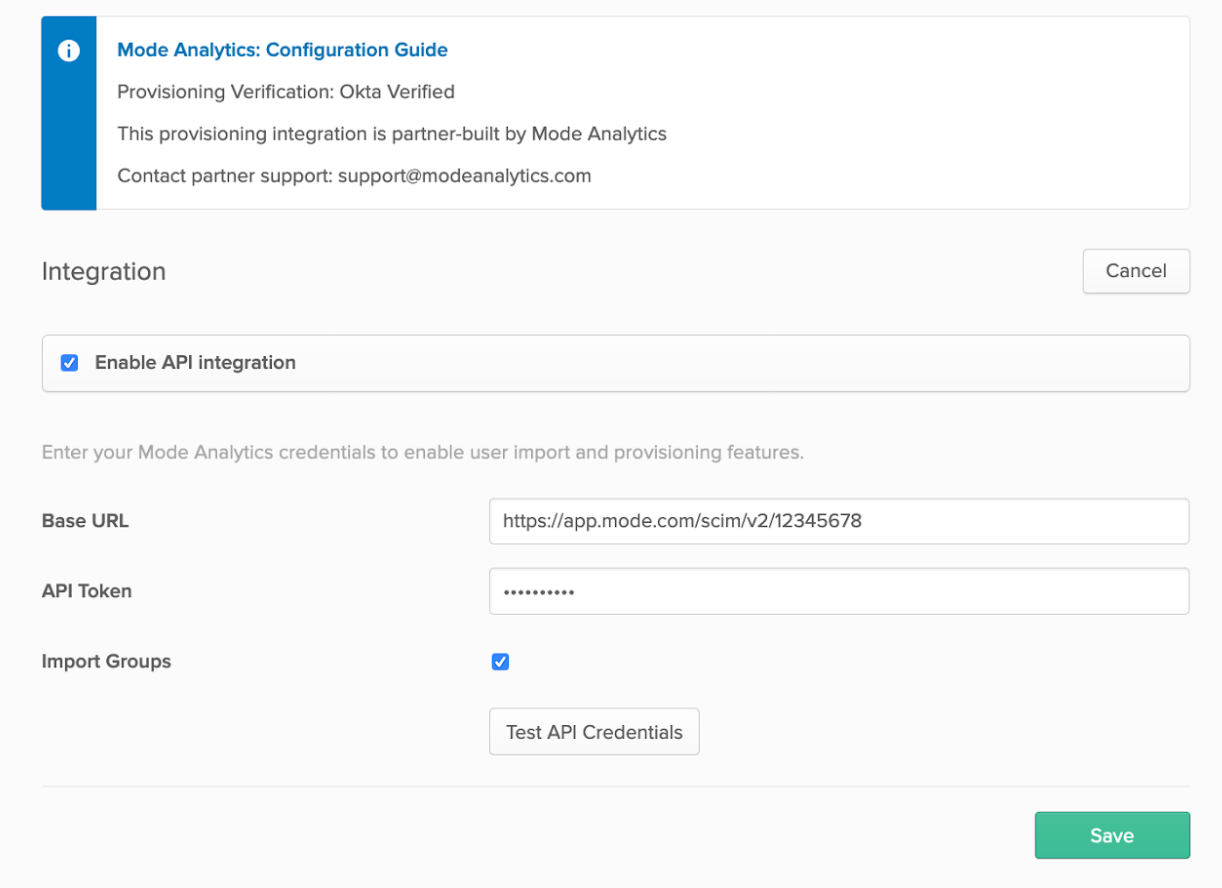
Login to Okta as an Administrator. Navigate to your Mode Analytics application from the Admin page.
-
Select the Provisioning tab. Check the Enable API Integration box.
-
Enter the SCIM 2.0 Base URL from the Mode SCIM config settings panel.Enter the OAuth Bearer Token from the Mode SCIM config settings panel.
-
In Okta, click the Save button:
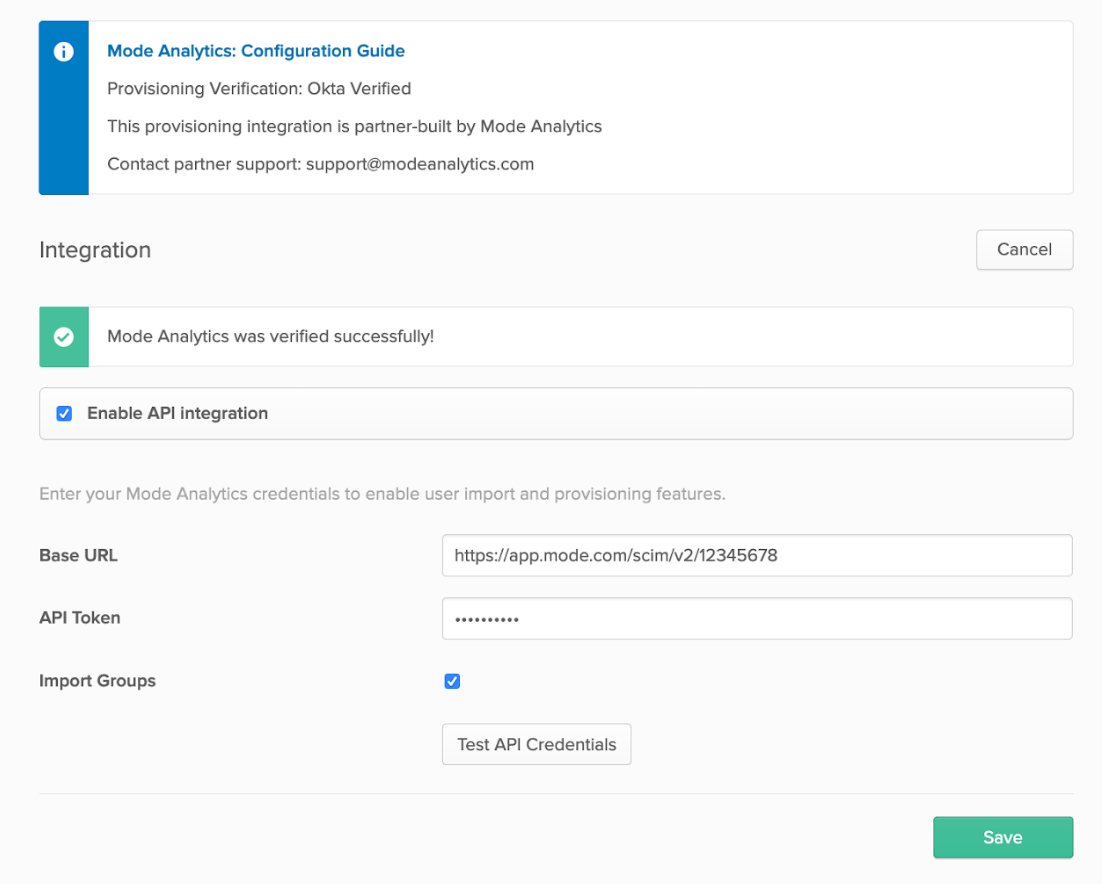
 You should see a message confirming the integration was authenticated successfully with an option to test credentials:
SCIM Connection Points
After configuring SCIM for your Mode app in Okta, enable the following connection points:
-
Create Users: When this connection point is enabled, users will be created in Mode when the app is assigned to them in Okta.
-
Update User Attributes: When this connection point is enabled, a user's attributes will be updated in Mode when the app is assigned to them and any future attribute changes will automatically be synced to Mode.
-
Deactivate Users: This connection point allows you to deactivate a user's Mode account when it the Mode app is unassigned from them in Okta. Accounts will be reactivated when the app is reassigned.
-
Group Management: Mode supports group management through Okta's SCIM connector, so you can create, update, and deactivate groups directly in the IDP.
Select To App in the left panel, then select the Provisioning Features you want to enable:
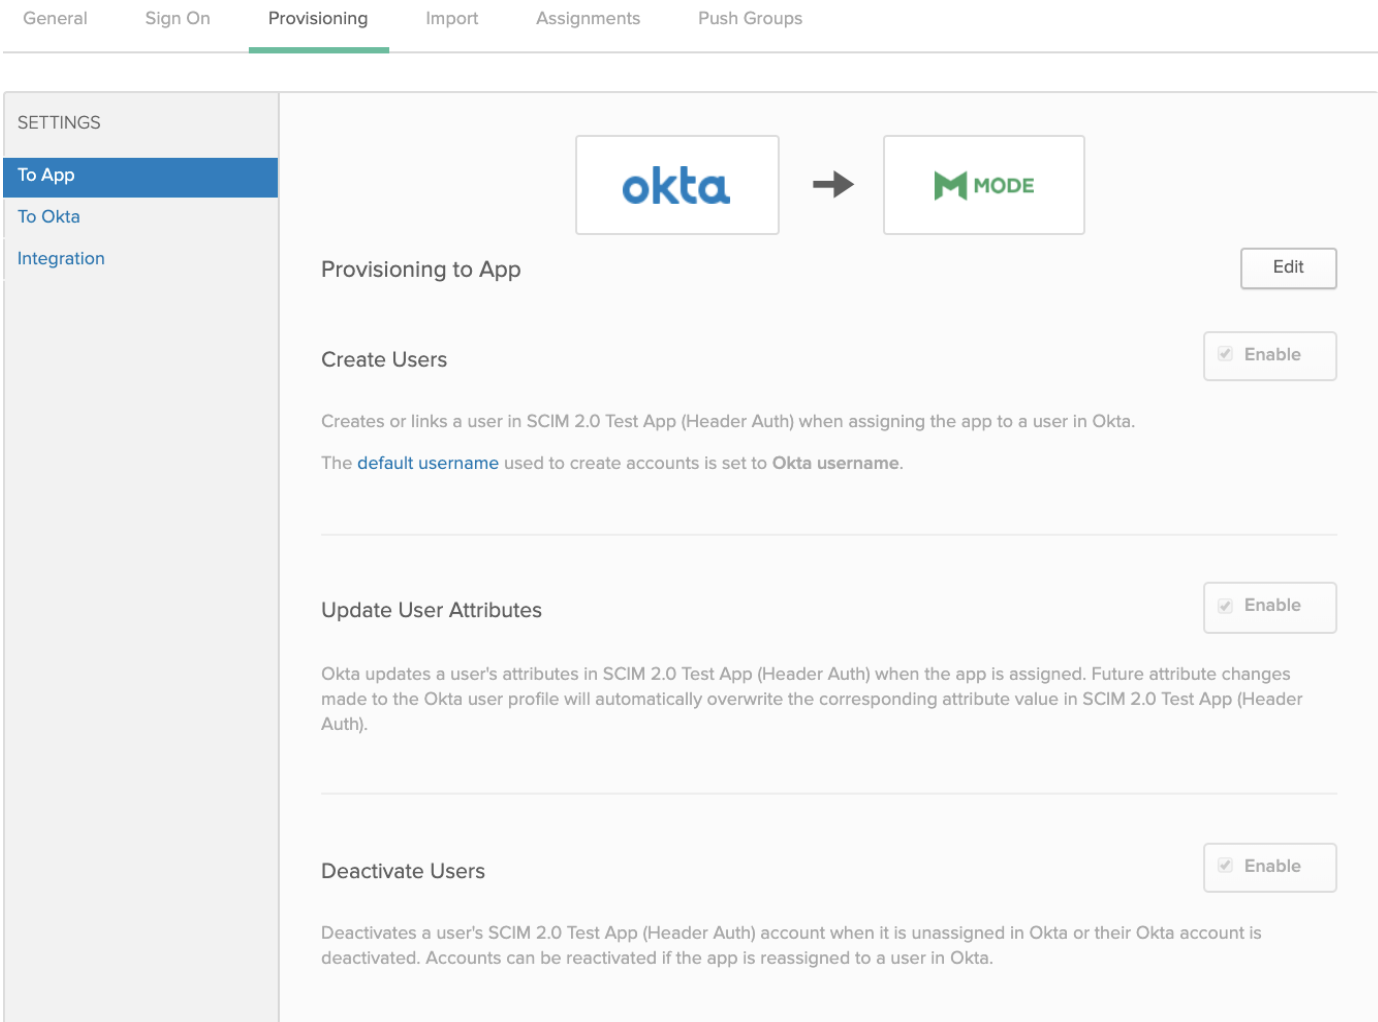 Click Save.
You can now assign users to the app.
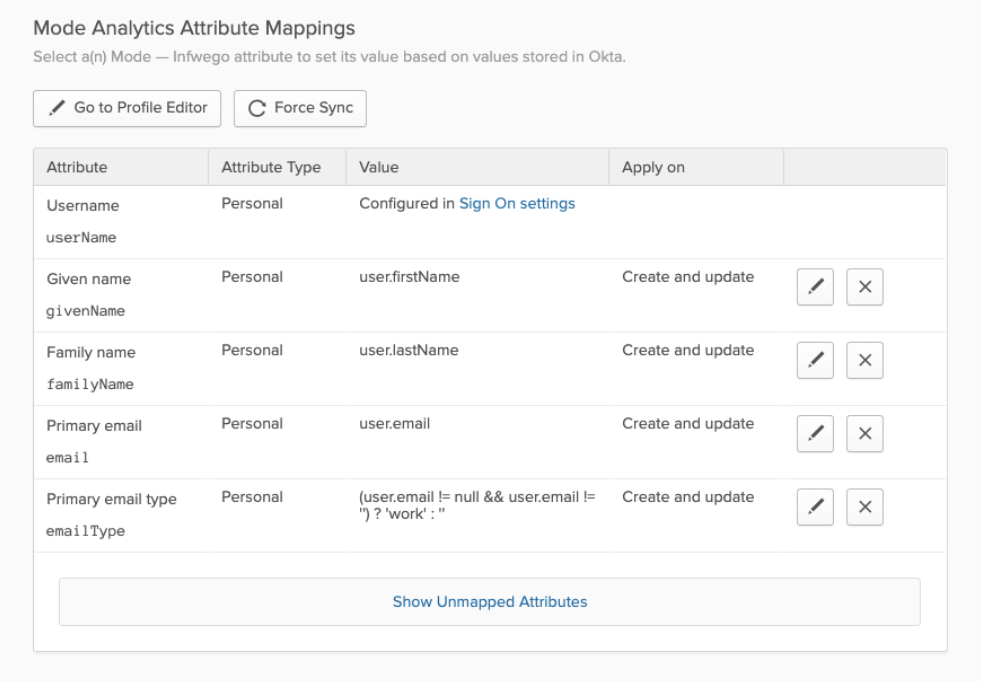
Attributes and Mappings
Mode supports users pushed from Okta with Okta mastering the userName, givenName, familyName, email, and emailType attributes. Mode uses only the user’s primary email internally. While Mode accepts any userName, we recommend that this attribute be set to the primary email (the Okta default).
Mode-mastered attributes are only supported in the initial SCIM setup and matching process.
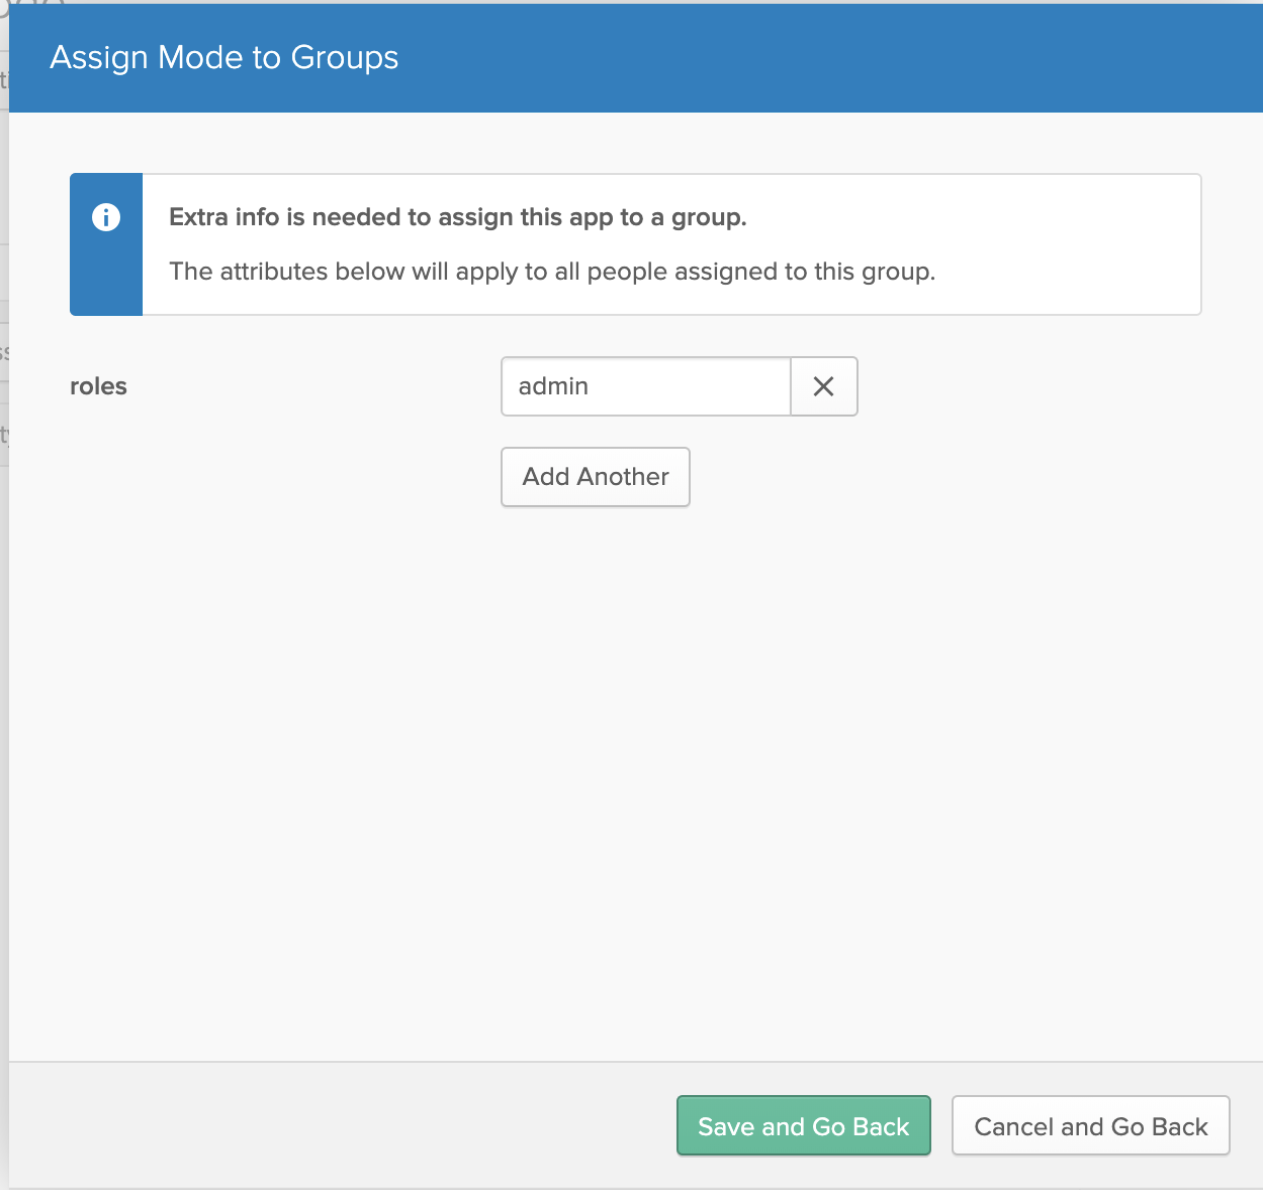
Mode supports designating admin users via specifying admin as the value of the role attribute. Other values for role will be ignored.
Specify admins in Okta to ensure users retain their Mode roles. To see who is currently an Admin, go to Workspace Settings > Members in Mode.
Assign Mode Admins
Mode supports designating admin users via specifying admin as the value of the role attribute. Other values for the role will be ignored.
Specify admins in Okta to ensure users retain their Mode roles. To see who is currently an Admin, go to Organization Settings > Members in Mode. To grant users in a group Admin access to Mode, add the following attribute to the group:
Users and Groups
Mode supports Group Push with Okta, which allows admins to push groups from Okta to Mode, as well as manage groups that were created in Mode through Okta.
For more information on Group Push, see Okta's documentation on Using Group Push and Enhanced Group Push.
Azure Active Directory
Mode requires that SCIM customers have completed the SAML setup process and have a working AAD-Mode integration before setting up provisioning features with SCIM. Organizations wishing to use SCIM are required to use SAML as their sole signin method.
See here for more information on how to set up SAML in Mode.
See here for AAD’s setup documentation
Reference
Microsoft AAD Documentation
Supported Features
- User Assignment: Ability to assign a user
- Group Assignment: Ability to assign a group of users
- Updating User and Group Assignments: Includes updating and removing user or group assignments
- Admin Role Assignment: Ability to assign the Admin role to users
Configuration Steps
- On the Member Authorization tab on the Workspace Settings page, turn on the switch labeled Enabled SCIM. Note that if this switch does not appear, you should contact your Customer Success Manager for further assistance.
- Click View Config Settings. You will need to copy the Base URL and OAuth Bearer Token into your Azure AD App’s Provisioning configuration
- Login to your AAD portal as an Administrator.
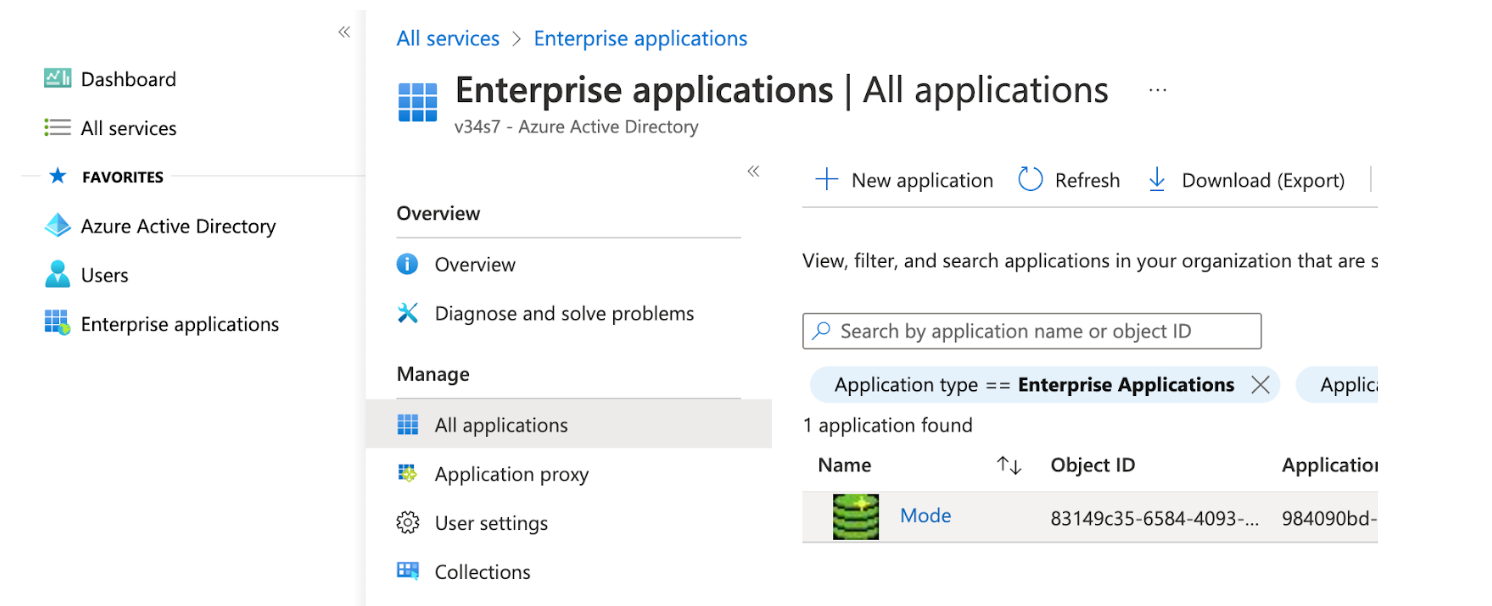
- Select Enterprise applications from the left pane. A list of all configured apps is shown, including apps that were added from the gallery. Select + New application > + Create your own application. Then, follow the steps here to create the application.
- In the app management screen, select Provisioning in the left panel. In the Provisioning Mode menu, select Automatic.
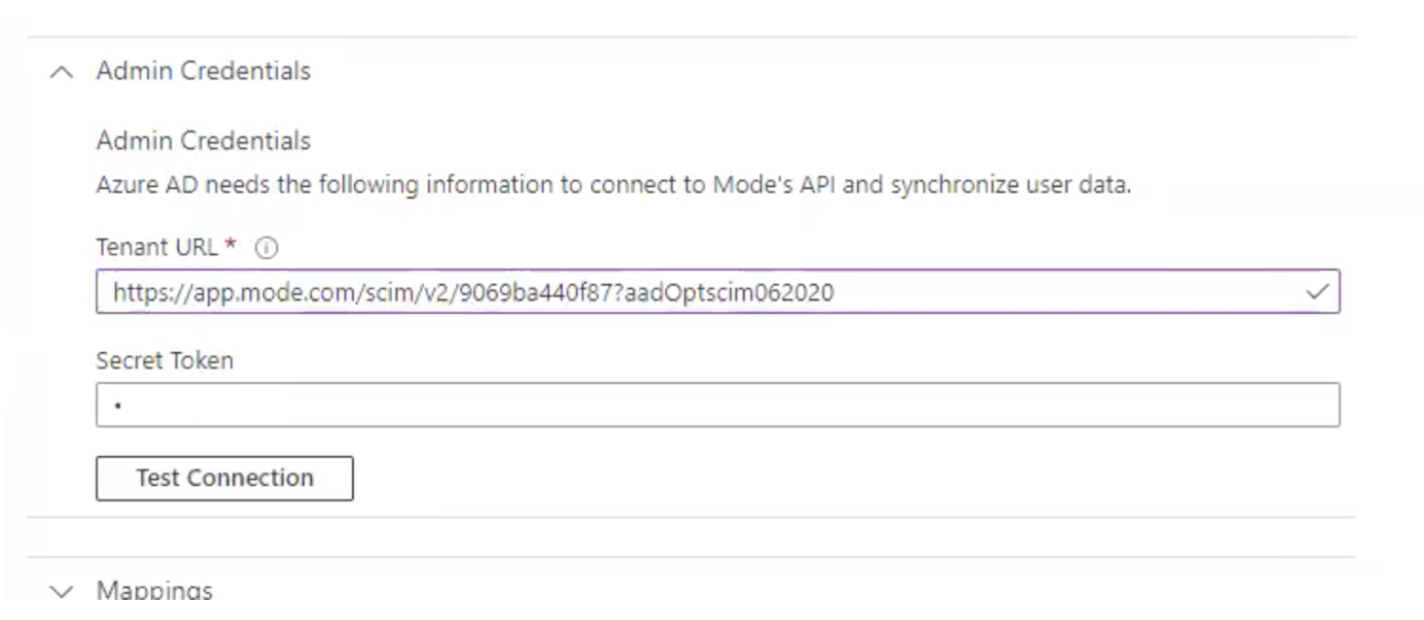
- In the Tenant URL field, enter the 2.0 Base URL copied from Mode settings and append the following parameter
?aadOptscim062020. Add the OAuth Bearer Token in the Secret Token field. See screenshot above for what the full URL should look like. - Select Test Connection to have Azure Active Directory attempt to connect to the SCIM endpoint. If the attempt fails, error information is displayed. If it succeeds, click Save.
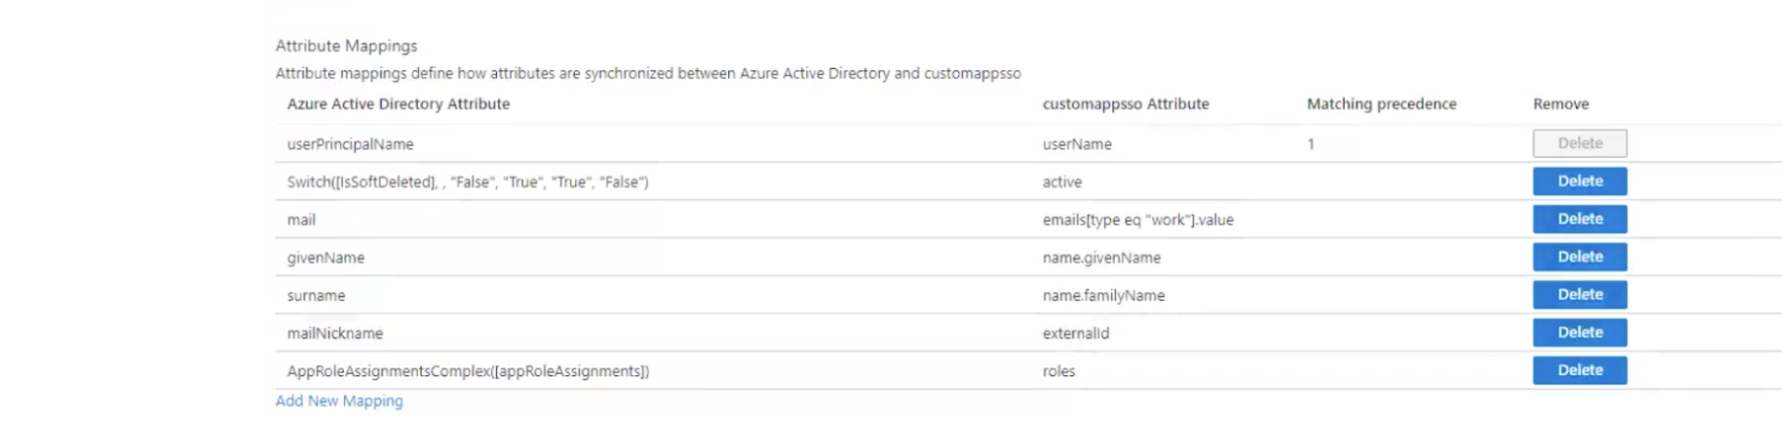
- In the Mappings section, there are two selectable sets of attribute mappings: one for user objects and one for group objects. Select each one to review the attributes that are synchronized from Azure Active Directory to your app. The attributes selected as matching properties are used to match the users and groups in your app for update operations. For Mode, the username attribute is populated with user email and will be used to map existing Mode users to users in Azure Active Directory.
- a. The list of mappings is pre-generated. You may need to delete some and make some updates to edit/add attributes if they don’t show up in the dropdown list already. See the screenshot below for the list of required attribute mappings
- Select Sync only assigned users and groups to only sync users and groups assigned in the Users and groups tab. Attempting to sync un-assigned users and groups will result in creating Mode users for all users in your tenant, so ensure that you only sync assigned users and groups.
How to Assign Mode Administrators
There’s two major parts of setup for this before Admin assignment can happen:
- The role must be created, in the application’s App Roles
- The mapping must exist for the assigned roles to be passed along to Mode
Creating the Admin user role
(See Microsoft's documentation on adding roles)
- Find your app registrations within the Azure Active Directory dashboard
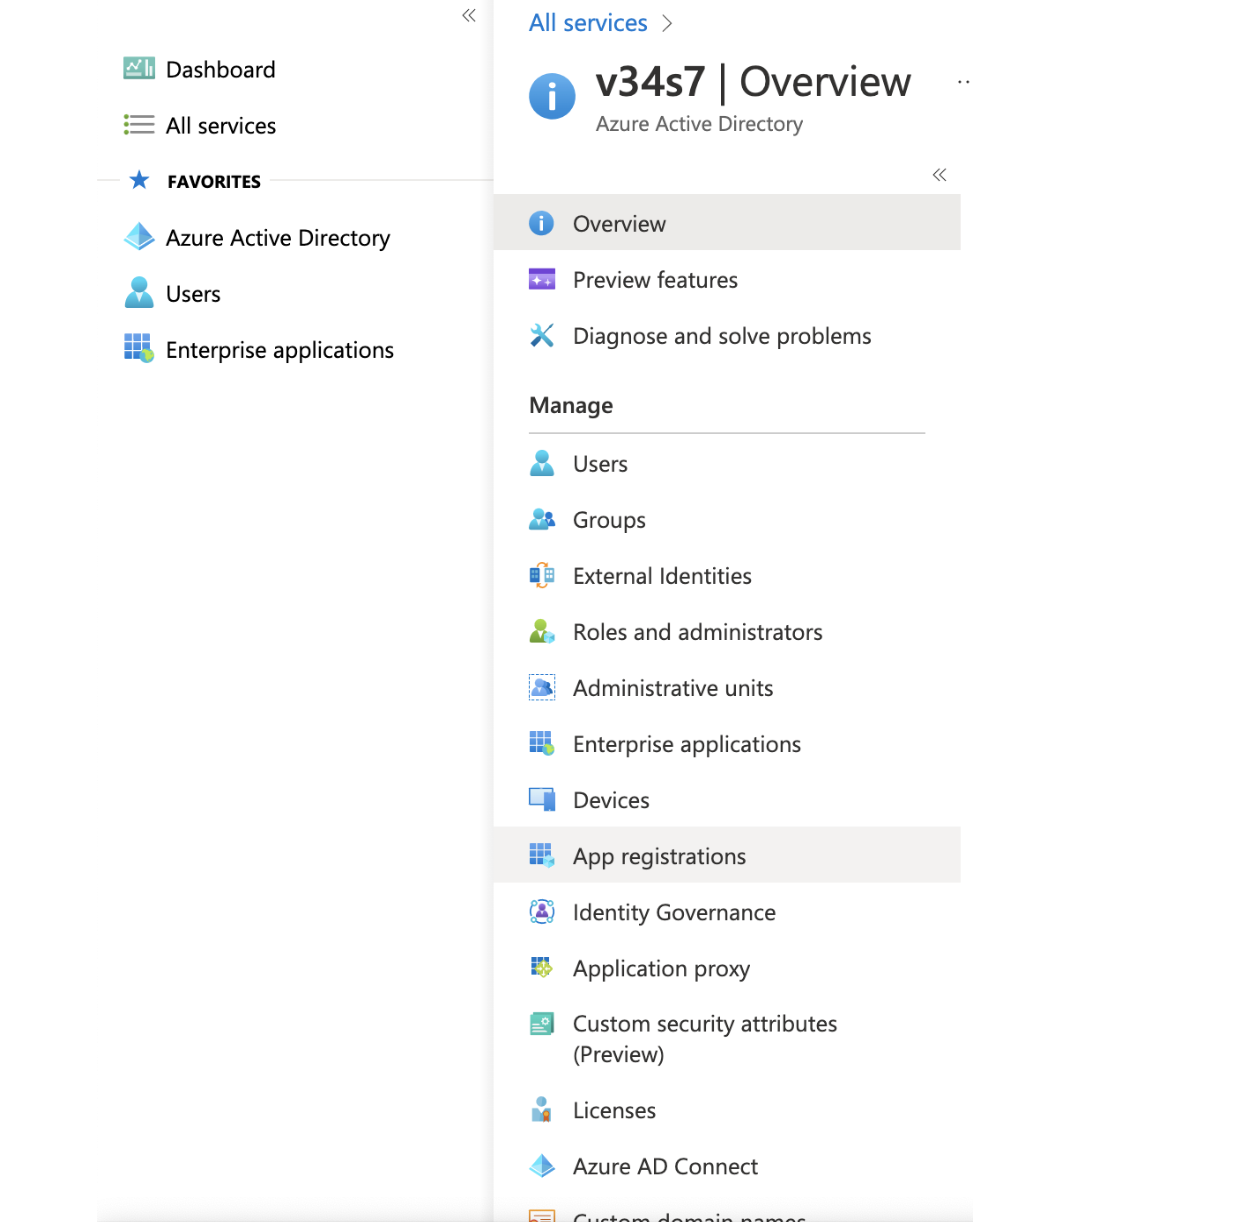
- Select the Mode application. It might be only visible after selecting all applications since the default view is only owned applications
- Within the application’s dashboard, select App Roles in the navigation
- Select Create App Role at the top, and fill in the following values:
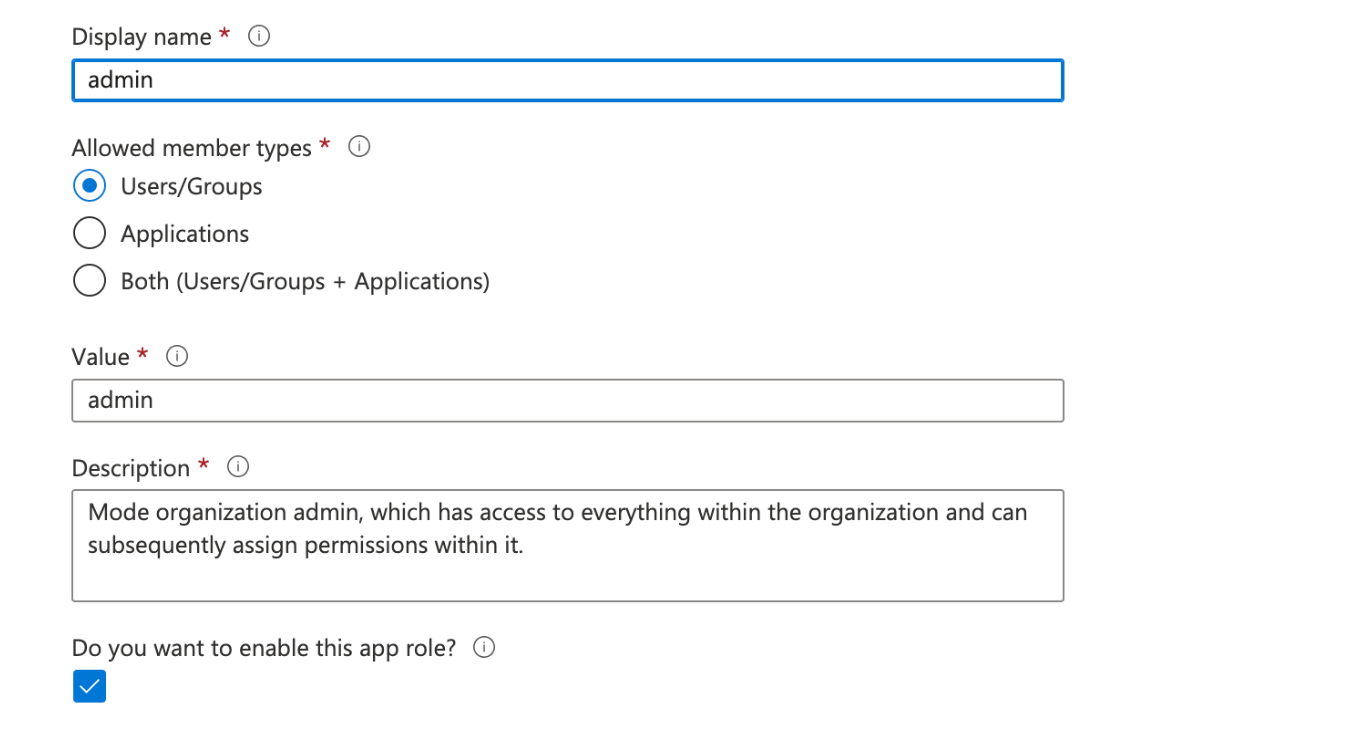
- a. Please match case shown (all lowercase in value and display name)
- Be sure to select Apply at the bottom to finalize the role creation
Creating the Admin Role Mapping
-
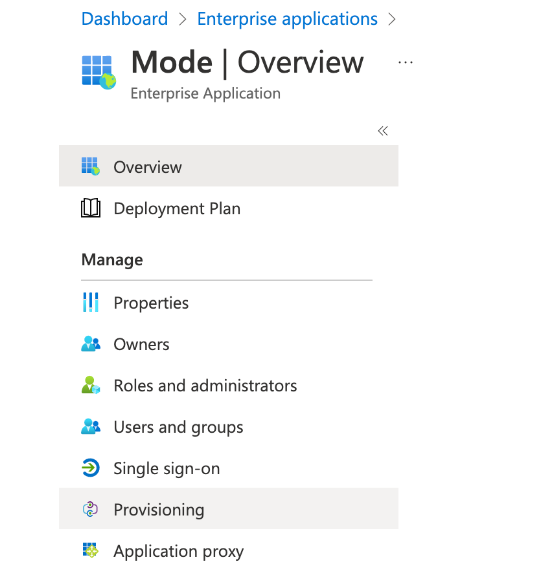
Find the Mode application within the Enterprise Applications section of the main nav
-
Select Provisioning from the Application nav
-
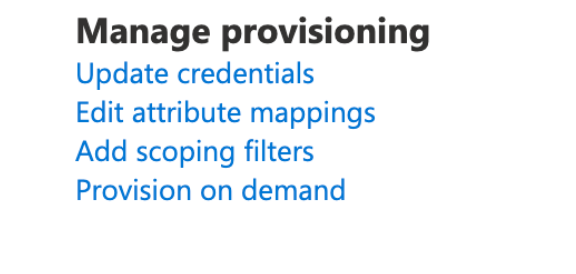
Select Edit attribute mappings
-
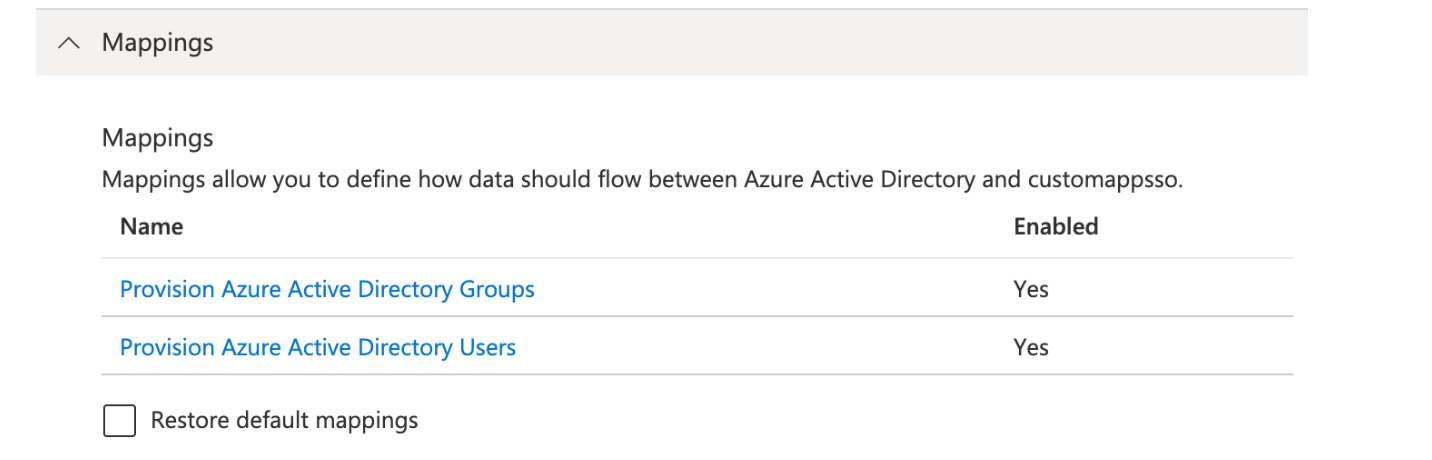
Open the Mappings popout and select the mappings for Azure Active Directory Users
-
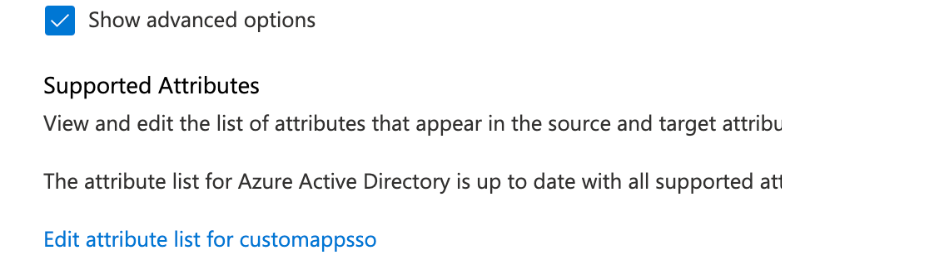
At the bottom of the mappings page check the show advanced options box and select edit attribute list for [application name]
-
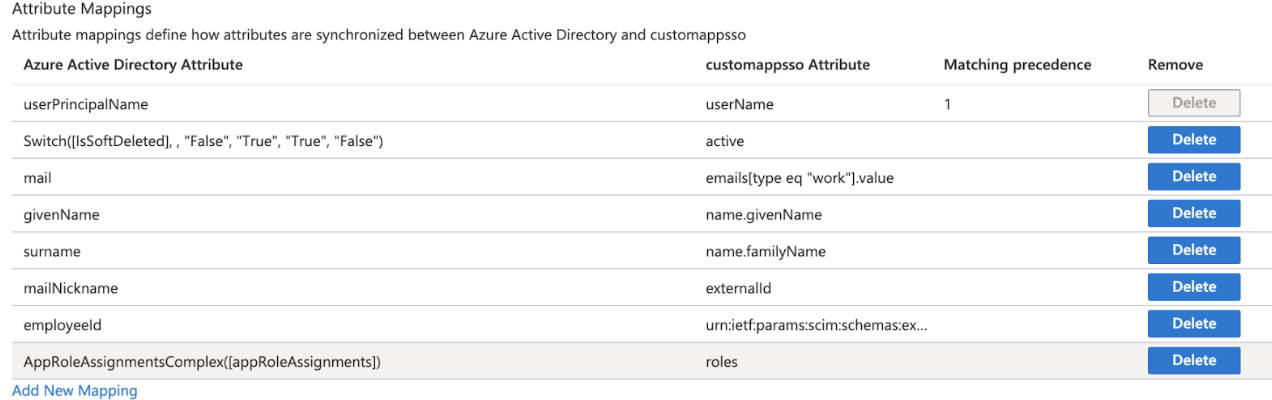
Scroll to the bottom of the existing attributes list and add a new one on the final row, with the following attributes
Name: roles
Type: StringCheck the third box which should be titled at the top as multivalue and Save the changes at the top

-
Return to the user mappings at step 4
-
Select Add New Attribute at the bottom of the list
-
Create the new mapping with the following values:
Type: Expression
Expression: AppRoleAssignmentsComplex([appRoleAssignments])
Default value if null: blank
Target attribute: roles
Match objects using this attribute: no
Apply this mapping: always
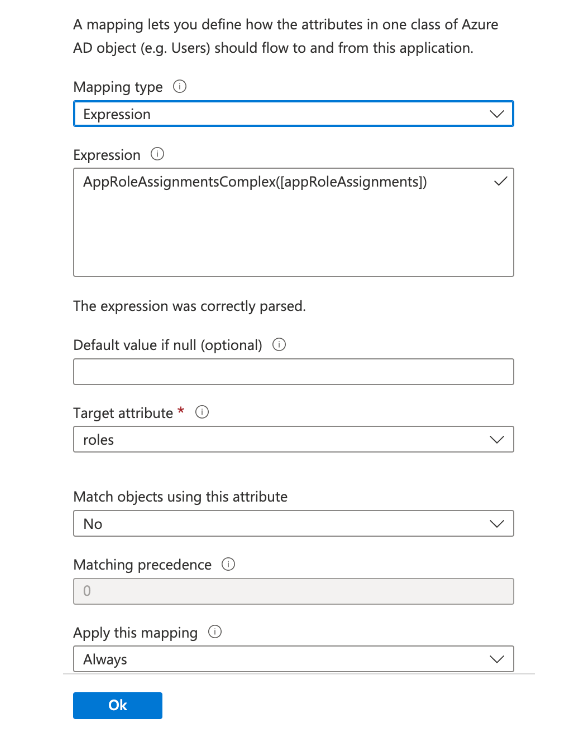
- a. The role value will only be in the list if you’ve successfully done the step to add attribute prior to this
- Save the mapping
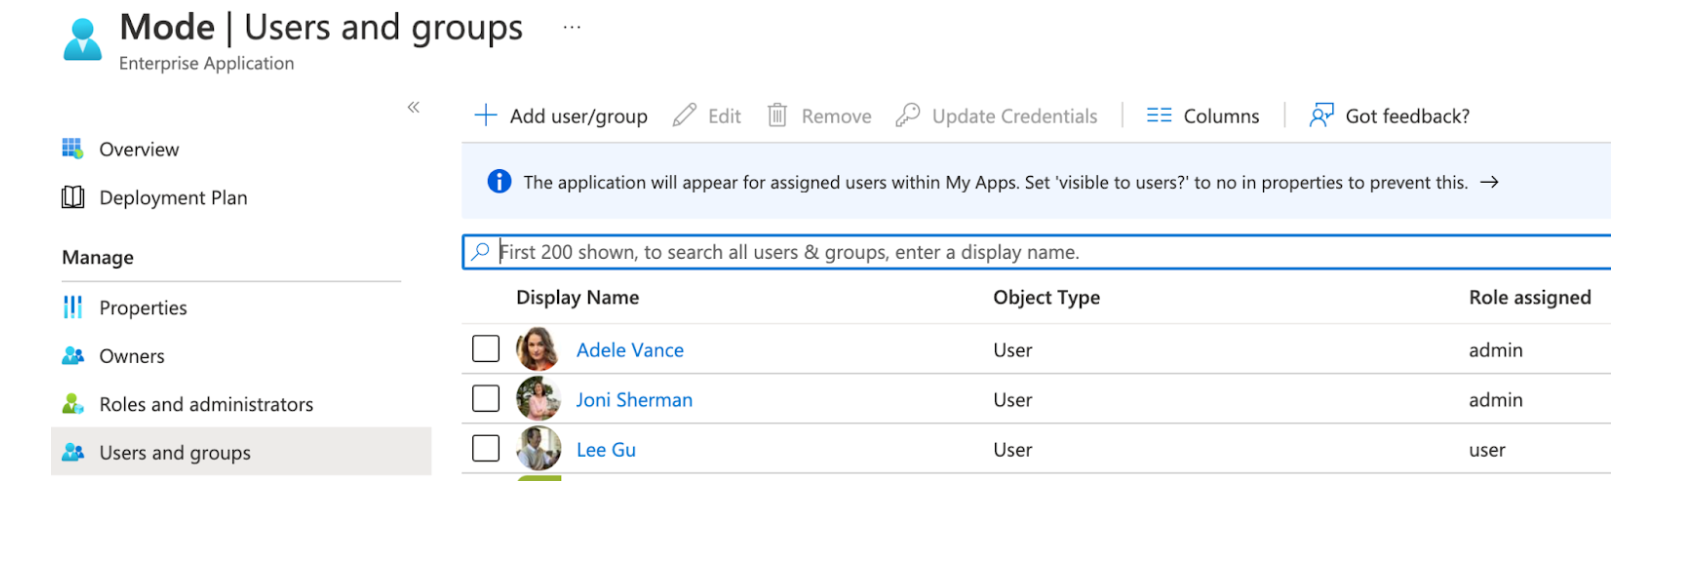
Once both of these major steps above have been completed, you will be able to assign the role Admin when assigning a user or group of users in the Users and Groups menu.
Best Practices
- If you want existing Mode users to be managed via SCIM, ensure that the Mode user's attributes (email, specifically) match the SCIM user's attributes. Once the user is successfully being managed by SCIM, all future changes should be made in the SCIM provider and pushed to Mode.
- Only use SCIM for provisioning once initial setup is complete. You can update your Mode workspace settings to disable manual inviting.
- Use group provisioning rather than individual user provisioning to ensure access controls and roles are set up correctly.
- For initial set up, start with one user or group to test that provisioning is set up correctly.
FAQs
Q: Can I update user emails via SCIM?
Yes. To update user emails via SCIM, update the email in the identity provider (e.g. Okta, AAD). You may need to re-push groups from Okta to ensure that the changes are applied in Mode.
Q: What is the default session expiration length for logged-in sessions?
By default, logged-in sessions to Mode expire after 30 days, at which point users must re-authenticate. If you are an admin and would like to adjust the session expiration length for your Workspace, please contact us.
Q: How to support users connected to two Workspaces via SCIM
We do not currently support users being connected to two workspaces using SCIM. If you have a second workspace for sensitive data, it is recommended to keep that data in the same workspace and use permissions to manage access.
Q: Group names need to match between Okta and Mode. Does this also apply to Group memberships?
Group memberships do not need to match between Okta and Mode, but anything that is pushed will overwrite what is in Mode and replace it with the Okta group members. So if a member is missing from the Okta group being pushed, they will no longer appear in the Mode group once synced, and that Group’s contents will only be manageable via Okta.
Q: Can we test the SCIM integration before enabling it for all members?
It is not possible to create a second Okta integration within a Mode workspace. We only allow one SCIM instance per workspace, and we recommend that you sync a few test users (not yourself) before syncing everyone.
Q: What happens if I want to stop using SCIM?
Go to Workspace Settings > Member Authorization and disable the SCIM feature. This will stop syncing your users and allow you to remove users and groups manually that were previously managed by SCIM.
Troubleshooting
Both Okta and Azure provide logs for provisioning. If a user or group is not provisioned or provisioned incorrectly, check the logs for errors. If the error cannot be resolved easily, write into Mode support.
| Issue | What to do |
|---|---|
| Users not added to Mode groups when provisioned from identity provider | Users assigned to the Mode app within the identity provider before SCIM is configured will not be created or linked to their Mode account. AAD Check the user is assigned to the Mode app in AAD, check that the group is assigned to the Mode app, then re-provision the group to Mode. You can also stop and restart provisioning in AAD if you check the logs and there are errors. If re-starting provisioning doesn’t work, reach out to Mode support. Okta To ensure proper access to their account and groups, un-assign and re-assign the user to the Mode app in Okta. Then, re-push the group to Mode. |
| Users who were previously Admins lost their Admin role. | Check that Admin access was granted by using the role admin (case sensitive) when provisioning the user from the identity provider. |
| User accounts aren’t linked to the identity provider accounts | Check that the email in the identity provider matches the user email in Mode |
| Unable to manually invite users in Mode | There is a Mode workspace setting that disables manual invites and group creation to reduce the risk of mismatches between the identity provider and Mode. Admins can disable this setting to allow manual invites and group management, by going to Workspace Settings > Member Authorization and disabling the toggle for Use only SCIM for provisioning |
| "Sorry, your organization has disabled that sign in method. Please check with your administrator" Error | One reason may be that your email address is not the same as the one that is set up in your SAML provider. Another possibility is that the email domain associated with your account has not been claimed by your workspace, or that your workspace has disabled the use of SAML as a login method. |
| I haven't received an email confirmation to join my workspace after signing up | If you are unable to join a workspace or are experiencing difficulties during the onboarding process, it is recommended that you check with your workspace administrator. Admins have the ability to control and restrict the addition of new members to the workspace. If you are unsure who the admin users are in your workspace or need confirmation that this is the issue, you can reach out to our customer support team. |
Was this article helpful?